5.31.2012

Wedding Details {or what shape was your cake?}

I've been having fun following along with Kelley and Liz's Wedding Week. I decided it would be fun to play along! Sit back, relax, and enjoy me telling you about why my wedding was the best wedding ever {not really, but I enjoyed myself!}. Truth be told, so much went wrong the day of the wedding!

Brad proposed to be on a beach over fireworks Memorial Day weekend 2008. We quickly set out on deciding on a date. We got married December 28, 2008.

My parents were in town a couple of weeks after we got engaged for my college graduation. Before the graduation ceremony, my mom and I went dress shopping. I knew I wanted something strapless {a friend mentioned that her selves dug into her skin and restricted her from hugging people} and something timeless. My mom kept picking out dresses with pick ups for me to try on. Don't get my wrong, those dress are pretty but I don't think they're timeless.


I ended up selecting a a full length ball gown with lace and beading all over. The train was super long. It was so much fun! I really love how it looked all bustled up. I defiantly had second thoughts about the dress after buying it. But when I put it on on the day of the wedding I knew I had made the right choice.


We chose colors based on Vincent Van Gough's Starry Night. My bridesmaids {who were my three college roommates and my best friend} wore knee length iridescent navy dresses. One of my amazing bridesmaids detached the sashes that went with the dresses and made the royal blue ones out of fabric I found at a flea market. Attaching the sashes and getting them to stay right was a last minute {like as we got ready for the wedding} venture. I'm not going to lie...I have some really funny pictures of this process. For the sake of my amazing bridesmaids, I'm not going to post those pictures. 

My hair was done by one of my roommates. Another roommates mom {who is a Mary Kay rep} did my makeup and provided all of my bridesmaids with similar shades of eye shadow and lip stick. My wonderful bridesmaids were such good sports. They worse nylons even though they all hate them. My mom insisted and since I didn't have the wedding in my home town {which my mom brought up whenever she was mad at me} I figured I'd give her this one. Plus, it wasn't me wearing them! I had a full length dress so no one could see that I didn't have them on!

Yes, my husband thought it would be fun to read in a tub before the ceremony!
We got married in an old victorian mansion. The venue had lots of character. There was a whole floor upstairs with rooms for us girls to get married. There was also a man cave downstairs complete with video games and a pool table. We had an intimate ceremony and dinner reception. 

The venue provided the fun little lanterns. It made decorating a breeze and super affordable. We bought a pack of tea lights and tea light holders from Ikea and spread them around the lanterns. The chair covers were not suppose to be on. The chairs were beautiful old wood. I spent HOURS making flower decorations for the chair backs. They ended up being put on the aisle only because they didn't want us attaching them to the chair covers.


We made triangles out of card stock for our table markers. Each side had a table number on it. One side had a picture of me at the table number's age and the opposite side had a picture of my husband. Lost of people went around to all the tables to see the pictures of us. Embarrassingly enough, I was 5 in this picture!


The guest book was a wish jar. There were tinny little papers and tinny little envelopes for people to write down their wishes and advice for us. We had so much fun reading through them. Its still displayed in our home.


The flowers were both amazing and a disaster all at the same time. I did everything right. We met with several florists. We brought pictures. We had a design meeting. Yet, my bouquet is the only thing that turned out right. I absolutely loved my bouquet. It was beyond perfect. My bridesmaids flowers ended up looking small and cheap rather than how we had assembled them a couple weeks before at the design meeting. My mom's corsage feel apart after an hour. I had a fun and quirky corsage picked out for the wonderful friend who read scripture at the wedding. Instead, they sent a twig bracelet. I kid you not...it was a twig bracelet!


One of my roommate's dads performed the ceremony. I loved that someone who knew us {well really me} and cared for us performed the ceremony. A dear childhood friend played the piano and sang. Funny story about the music...my brother in law thought it would be really fun to lock his knees during the ceremony so he fainted in the middle of the song. Thankfully, he bounced right back. Unfortunately, he cut the music short! 


The cake was made by Brad's mom. When we got engaged, Brad said I could do almost anything I wanted as long as he got to pick out the cake shape. I said why not. It may not have been the best idea. Yes, my cake was pyramidical. I decided to run with the whimsy and used fondant cutouts in our colors to decorate it. Brad loved the cake. We had a funfetti with buttercream filling layer, a chocolate with andes mint cream filling, and a vanilla with champagne filling layer. They were all delicious! I think the cake nearly killed my mother.


We had a lot of fun dancing at the reception. Our friends were very good sports and danced despite the terrible DJ. The DJ was a house DJ. We had a meeting a couple of weeks before the wedding to discuss our special songs and our no-play list. Well, the first song after the traditional dances was that stupid "Don't you wish your girlfriend was hot like me." Yah, not thrilled. They also didn't play any of the songs we requested. Still, our friends and Brad's little cousins seemed to have fun on the dance floor!

Despite the hiccups {which most people didn't even notice}, the wedding was just what I wanted. We wanted a small group of family and friends celebrate with us. That's exactly what it felt like...a celebration.

We stayed at a Bed & Breakfast in the Sierra foothills for a couple of days for our first honeymoon. That gave us time to save up for the trip we actually wanted to take. A year later, we went on our real honeymoon to San Juan, Puerto Rico. We had an ocean view from our hotel room and spent five days exploring the island.


5.30.2012

Easy Peasy Receiving Blanket {or more people having babies}


When we moved here, I was five months pregnant. We were lucky to find a Sunday School class with a great group of young families. Most of the families had kiddos between six months and two years old when we started. I call Emma the Sandwich Baby. There's all the kiddos who are a year or two older than her. A couple of months ago, the first of the second wave of babies was born. Between now and November, at least six women are expecting. So, there's lots of showers to be making gifts for. 

I think I'll be making these Easy Peasy Receiving Blankets for each of the many showers I have coming up. They are super quick and look great for the next to no effort required. They rag more and more with each wash. All you need is two one-yard cuts of flannel and coordinating or contrasting thread! I stocked up on flannel when Joann's was having a $2.50/yd sale a couple of weeks ago.


I hate pre-washing fabric. I an not a fan of the big old ball of mess that comes out. I know many have an aversion to washing fabric too. Despite this, make sure you pre-wash your flannel for this blanket. Flannel shrinks a lot and any of you who have had little ones know how much you wash receiving blankets!


Start out by evening up your fabric and getting rid of that nasty threaded mess that the wash caused.

I like the look of rounded corners. I recently learned a quick tip for having evenly rounded corners on each side. Place your fabrics wrong sides together {ignore the picture!} and use a disappearing ink pen to trace around a plate or bowl. Then fold your blanket into fourths {so all four corners are stacked on top of each other} and cut along your traced line. Ta-da! Pretty rounded corners!


You can use a decorative stitch {if your machine is cooler than mine and has them}, a zig-zag stitch, or a good old fashion straight stitch. Whatever you choose, make sure its a short length. Sew with an inch seam allowance so you have a good area to rag.

Then, sit down, put your feet up, and go to town. Snip all the way around, being careful not to knick the stitches.


Throw your blanket in the wash and then dry it to start the ragging process. The blanket's edge will fluff up more with additional washes. You might want to let the momma to be know what kind of detergent you used. Some have concerns about detergents for little ones.


I'll be sharing the rest of the present for this little girl in the next few days.

Come party with me!


5.27.2012

What's Cookin' #8


Happy Memorial Day weekend, everyone. I hope you are all able to spend time with your family and friends as well as taking some time to thank someone who has served. 

Sunday: BBQ at a friends!

Monday: asagio chicken tenders with corn on the cob

Tuesday: chili lime tofu with rice and steamed snap peas


Friday: shrimp and pepper jack quesadillas with spanish rice and black beans

Saturday: Pho!


5.23.2012

Shopping Cart Handel Cover Tutorial {or my child likes to lick shopping carts}

Hi All! Well we are a big mess of ear infections, colds that will not go away, and a migrane for good measure around these parts. I'm hoping next week I'll get back to posting my weekly menu and random thoughts. Until then, please enjoy this post I shared last week over at The Ribbon Retreat.

Today, I'll be sharing a Shopping Cart Handel Cover tutorial with you all. As a shower gift, I was given an amazing shopping cart cover that covered the entire area where my little miss sits. It was amazing when she was smaller. It helped her sit up. Now that she's sitting independently, I wanted something a little more compact {ie fits in my diaper bag so I don't forget to bring it in with me!}.


All the tutorials out there only covered the part of the shopping cart where I put my hands to push. My little miss like's licking the part of the cart right in front of her. So, I set out to make something that kept her from licking the cart! This cart cover also includes ribbon loops to hook toys onto as well as a sippy cup leash.


Here's what you'll need to make your own:
1/2 yd of fabric {Pink Ice Cream from the Fly a Kite line by October Afternoon for Riley Blake}
1 1/2 yds of 1/2 inch elastic
30 inches of ribbon {Saddle Stich in Kimberly Pink}
12 inches of  3/4 inch Velcro
Basic sewing supplies {such as ruler, rotary cutter and/or scissors, pins, iron, sewing machine}

First, a note about my measurements. I used a Costco shopping cart for measurement purposes. I've found this to be the largest cart out there. Using these measurements will allow you to use this on the more standard sized carts as well as the club store sized carts. You can always measure the cart you use most frequently if you're worried about fit.


You'll start by cutting a rectangle measuring 37 inches by 13 inches. Then, you'll cut an inch square out of all the corners. This will make it easier to make the casing for the elastic later on.


For the toy loops and sippy cup leash, you'll need to cut three 4 inch strips of ribbon and then one 18 inch piece of ribbon. Two and a half inches from the bottom of the fabric is where you'll place your loops. Pin the center of one strip of ribbon at 9 inches from the left, another at 16.5 inches from the left, and another at 24 inches from the left. 


To sew on the ribbon loop, fold 1/2 inch of the ribbon under itself and then stitch. You'll want to make and X and stitch down the sides to reinforce the stitches and make it so your little one doesn't yank the loops off pulling on her toys. Go ahead and repeat this for each side of your three loops.


Next, you'll assembly your sippy cup leash. To figure out how much elastic you'll need, measure around your little one's most used sippy cup. I cut an 7 inch piece of elastic.

Zig-zag stitch the ends of your elastic together multiple times to get a strong stitch. That will give you a loop to slip your sippy cup in. Next, slip the end of the elastic into a loop of the end of your ribbon. Then, sew the ribbon to your elastic.

To attach your sippy cup leash to your cover, slipp the end of your leash {the one that doesn't have the elastic} around one of the ribbon loops. Then, sew the end of the ribbon loop to the ribbon itself.


Now you need to attach your velcro. The velcro will be used to help secure the cover to the shopping cart. It will help prevent your little one's curious fingers from pulling the cover off. 

First, cut your velcro into two 6 inch pieces. Measure 8 inches from the left and 1 1/2 inches from the bottom and pin the rough side of your velcro facing down. Now, 1 1/2 inches from the top and 8 inches from the left pin the soft side of your velcro up. Check out the above picture to make sure you've got the velcro positioned right.

You'll repeat this processes one more time. Measure 8 inches from the right and 1 1/2 inches from the bottom and pin the rough side of the velcro facing down. Then, measure 8 inches from the right and 1 1/2 inches from the top and pin the soft side facing up.


Tack down the velcro by sewing a square. Make sure you're mindful of where the sippy cup leash is so you don't accidentally sew it to your velcro {not that I did that!}.


Ok, now you've got all your add ons sewn on and its time to get to making the elastic casing. The above picture shows what your cover should look like at this point.


Before you get to ironing, pin the velcro out of the way. 


To make the casing, turn and iron 1/4 inch towards the wrong side of the fabric and then fold and iron 1/2 inch pinning as you go. when you get to the corner, you'll fold the height of the fabric under the width of the fabric and pin the open edge that's left along the width.


Tack down this open edge as close to the edge as you can get. Don't forget to backstitch! This will keep your elastic from popping out.


After finishing off all four corners, you'll go ahead and sew your elastic casing. Make sure you leave an inch gap to thread your elastic through. I remind myself by putting a double pin where I need to stop.

Next, cut your elastic to 41 inches. Run your elastic through your casing. {Here's a tutorial if you need one.}


Overlap your elastic by one inch and zig-zag multiple times. I like to do it in two places to make sure that my elastic won't come apart on me.


Pull your elastic in and finish off your casing seam and you're all set to go shopping.


My little miss is such a ham these days. Despite the goofy face, she loved her new shopping cart handel cover!

Thanks for the kind feature!


Come party with me!

5.21.2012

Thank You Giveaway Winner {or congrats!}

Again, I can't thank you all enough for taking time out of your busy day to read my little blog. Its very humbling to be apart of this wonderful blogging community.

Congrats, Kelley @ The Grant Life. Random.org selected you as the winner of the Joann's Gft Card. An email is on its way.

Happy Monday, everyone!

5.19.2012

Father's Day Gift Idea's {or getting a head start}

First, I need to start this post out by saying if you're married to me you shouldn't be reading this.


I'm getting a head start of Father's Day ideas. The weekend before Father's Day is Emma's birthday. We're having a party and family from out of state will be here for the better part of a week. I've got a ton of projects to get working on for it. Plus, I'm too cheap to pay for shipping so I want at least get my Dad's present done by then. Why ship when I can make him take it home with him!?! I figured I'd share my research with you so that you might pretend to be on top of things too!

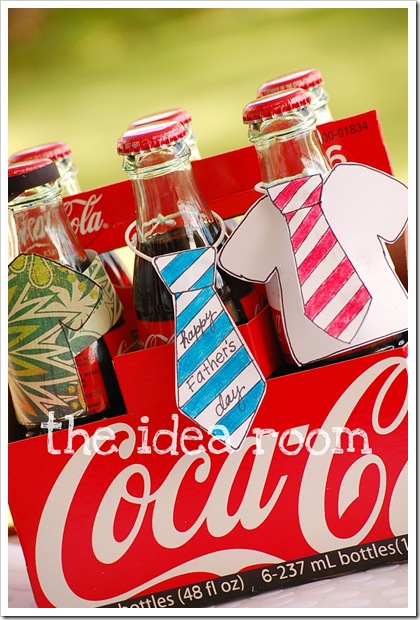
Father's Day Soda Bottle Covers by Amy @ The Idea Room
Want to give your soda a tie? Well Amy provides darling, free printables to make that happen.


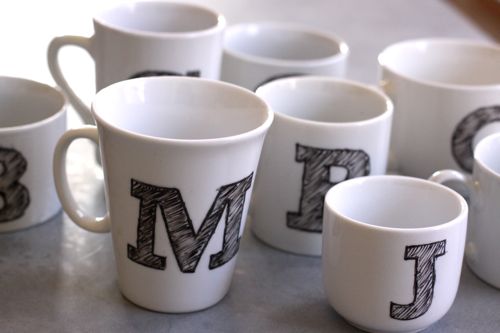
DIY Monogramed Mug by Gabby @ Design Mom
These are simple to make and low cost. You could even let your little ones doodle on the mugs! Some version of these delightful mugs will likely be made for my dad as apart of a tea gift set.


Upcycled Luggage Accessories by Jenny @ Craft Test Dummies
My Dad used to travel all the time. He also owns about a million ties {all ugly and from the 80s} that he never wears. I wish knew about this sooner!


Scrabble Picture Frame by Lariss @ Just Another Day in Paradise
A couple of weekends ago, I finally found a Scrabble set at the Goodwill. Looks like I might have found my first project using my newly acquired tiles.


Father's Day Photo Collage by Amy @ Positively Splendid
Some variation of this collage would be a sweet tradition to start with kids. Next Father's Day my little miss should be talking!


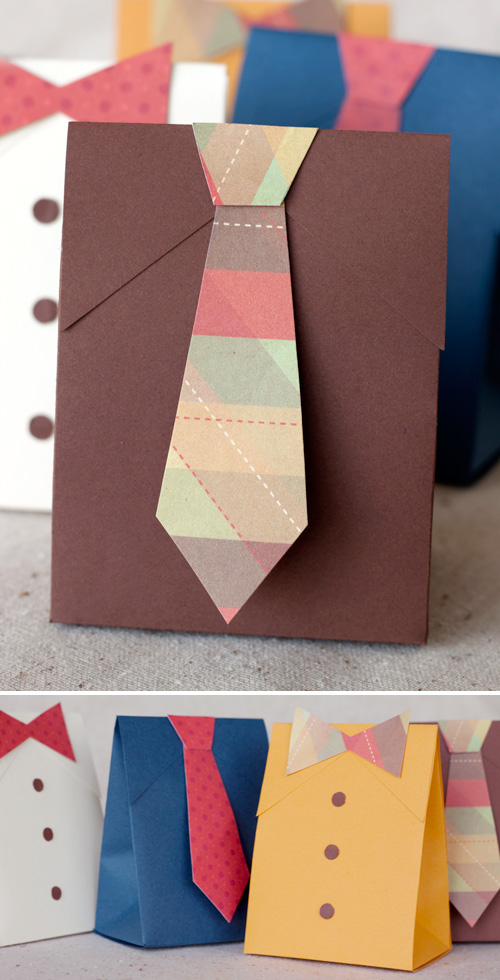
Paper Crave provides a free template for these cute little gift bag/boxes. The customization possibilites are endless with these guys!


Grill Rubs by Molly from the Creative Maven @ KoJo Designs
Molly provides three yummy sounding rub recipes. I Pinned these suckers when I first read this post last year. I think I may hold off until Christmas, but I will certainly be making these.


So there you have it...seven DIY Father's Day ideas. I'd love to know what you're making your Dad and/or your Husband!

Come party with me!


5.17.2012

Guest Post at the Ribbon Retreat {or my little ham}

Today, I'm over at The Ribbon Retreat's blog sharing a tutorial for a shopping cart handel cover. Come by and check it out!

Emma has started making goofy faces whenever she sees the camera or my cell phone. Its making for some wonderful pictures.


Come on by to learn how to make your own shopping cart handel cover! In the mean time, here's my little ham.

Don't forget about the thank you giveaway!