

When our little miss started to crawl, we did what many parent do and started looking on Amazon for baby gates. We had a 53 inch gap to fill in and one side that we couldn't drill into. Well, we quickly learned that our gap was too large for pressure mounted gates {which I really, really didn't want}. That, coupled with the inability to drill on one side, left us pretty stuck.
Let me warn you, this post is very long. However, its filled with pictures and instructions to help you create your own gate!
After suffering through a couple of months of chasing our little miss into the kitchen, I was fed up. So my husband got to googling and found that Alisha @ SungasaBugBaby had shared a great post on making a baby gate. My husband and I were inspired by her idea {and our desire to no longer have to keep chasing little miss all over the house} so we used it as a starting point to make a custom baby gate for under $50.
First, let's start with the supply list. Since everyone's gap is a different size {and most won't have the silly little decorative pillar to deal with}, sharing our cut list won't really help.
Supply List:
2X2s
1/2 inch, 10 foot long PVC
Gorilla Glue
2 hinges of your choice
Lock of your choice
Spray paint {we used three cans}
Drill and bit
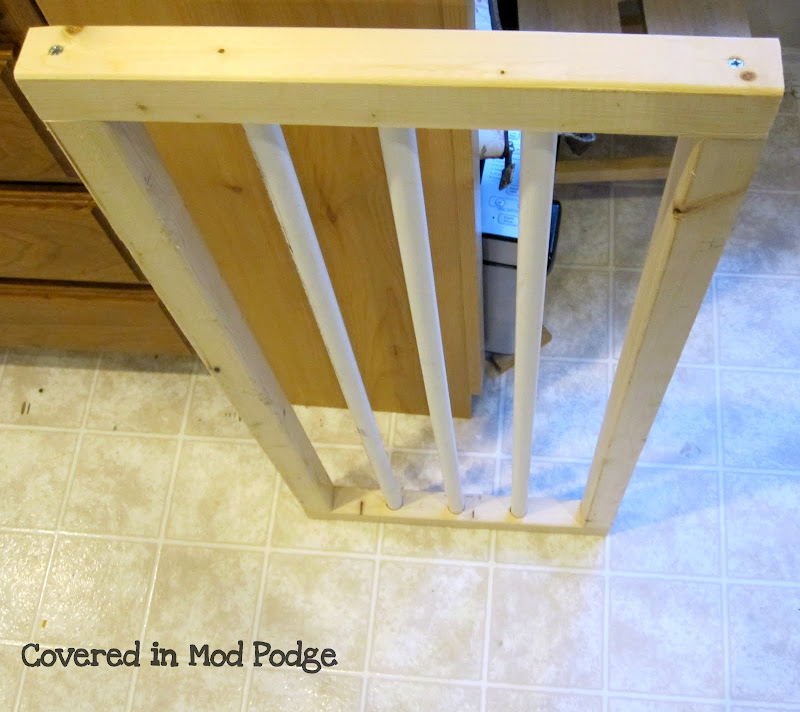
The gate was essentially made using wood 2x2s as the frame and PVC as the vertical bars. We had our wood and PVC cut at Lowes, since we don't own the appropriate tools to do this on our own. They were very nice and did not charge us for any of the cutting.

If using a 1/2 inch PVC, you will need a 7/8 inch wood drill bit to drill out the holes.

You'll start by creating the holes for the PVC pipe. We used 33 inches long PVC bars. The drill depth was 1/2 inch. Make a small indentation with the drill bit before drilling to increase accuracy. The holes need to be drilled both into the top and bottom pieces. Ours were drilled every three inches.

Next, you'll want to pre-assemble the gate to check to make sure everything fits. It will allow you to ensure that your drill depths are deep enough for everything to go together nicely.

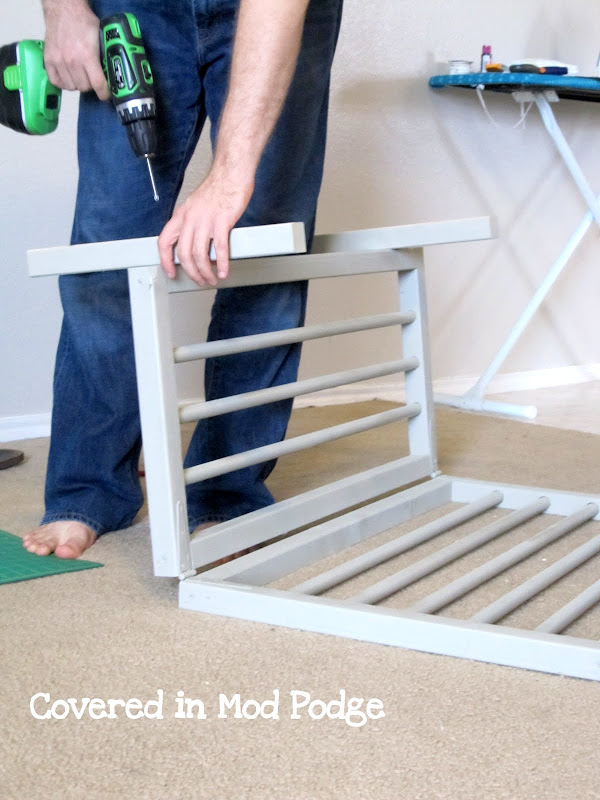
Prep your top horizontal 2x2 pieces with screws in order to allow for more easy assembling later on. {Please don't do this on your lament floor in the house you rent!}
Now, take the two horizontal pieces and screw them into the bottom horizontal piece {Sorry, there's no picture for this step}.

Oh, and don't forget to have a lovely assistant.
In order to assemble your gate pieces, you'll start out by adding Gorilla Glue to one of the bottom horizontal piece's holes. Then, add the PVC. Repeat this process for all of the bottom holes. Put the top piece on {without glue} and allow the bottom to dry. Putting on the top while the bottom dries allows the PVC to dry appropriately positioned. Then, glue your top piece on. After the glue dries, screw in your already prepped screws.
{A note on the glue: Apply liberally. We did not use enough and the glue has already come loose. However, everything is still holding together nicely. The bars just now spin.}
Repeat this process with all of your gate panels {we had three panels}.

Next, you'll want to add your hinges. Make sure the door {the swinging panel} is a 1/4 inch higher than the other panel so that it will glide over your carpet smoothly.

I was surprised by the color selection of the Valspar spray paints at Lowes. The paint will work for both the wood and the PVC. However, you'll have to do a few coats over the PVC. The black text is especially hard to cover up. Spray primer probably would have fixed this problem.

We spray painted the locks so that they wouldn't stand out.

Due to the stud spacing in our house, we had to build a bridge between the studs and then anchor to the bridge. If you have to do this step, attaching the bridge to your gate first will give you more control over your gate placement.

The other side of our gate was attached by drilling straight into a stud. We had to build a cut out in order to get over the decorative pillar and then add an extra piece of wood in order to make up the extra depth.

We built our gate for just about $50, including buying Gorilla glue, a saw, and the drill bit. If you already had these items, your gate cost would be considerably less. Regardless, we're trilled to have found a gate that fits our odd architecture, isn't a cheap plastic eye sore, and was affordable.

Success!

I love this!! What a great tutorial Michaela! We have the metal ones.. and they are pretty flimsy. When we move we will have to make our own. Thanks for the great idea :)
ReplyDeleteI highly recommend it, Kelley. It only took a couple of hours over a few days to get done!
DeleteOh my, what a great tutorial. Thank you for sharing! I never though about just making my own. It saves u lots of bucks:/ thanks again for sharing. By the way I'm your newest follower:)
ReplyDeleteThanks so much for following!
DeleteThis is a great idea! It must have been such a paint to try to figure this out, but so great once it was done! I think we're just a couple months away from having this issue!
ReplyDeleteIt comes so quick! And then they become super speedy little buggers!
DeleteHi! It's Heidi from sew.craft.create.
ReplyDeleteYou won the Imaginisce giveaway! Contact me at sewcraftcreate (at) gmail (dot) com, to claim your prize.
Thanks for entering!
-Heidi
Our kitchen entryway is pretty wide, so I might have to use this tutorial! Thanks so much.
ReplyDeleteIts well worth it! Its made our life so much easier.
DeleteGreat tutorial! Thanks for sharing. :)
ReplyDeletewow. this is crazy! fabulous job! i would love for you to link this post up to the spread the love weekend wrap up party i host on my blog. http://www.lovenotesbylauryn.blogspot.com/2012/03/spread-love-4-elissa-hudson-giveaway.html
ReplyDeletethere is also an AMAZING elissa hudson print giveaway going on right now as well.
hope to see you there!
{love} lauryn @ lovenotesbylauryn.blogspot.com
Thanks for the invite!
DeleteI have a tiny gap that i have to fill and im mexica living in mx so its not a thing people really use but i need it! So since i kno i wont find it easily i WILL try this :)
ReplyDeleteI'd love to see your version! Have fun building it!
DeleteThis is awesome !!! I'm stopping by from Cheri's party. New follower as well :)
ReplyDeleteIf you have a chance I'd love if you checked out my blog as well !
http://talesofadomesticmama.blogspot.ca/
Thanks so much! I'm excited to have you as a follower!
DeleteYay! This is so cute and just what I need for my puppy!! Thank you so much for a great tutorial!!
ReplyDeleteThanks, I'd love to see what you end up making!
DeleteGreat job! Baby gates are usually unattractive and pricey, but this is pretty and a great deal! Your assistant is a cutie, too! Thanks for sharing with us this week!
ReplyDeleteTake care,
Trish
Thanks Trish!
DeleteWhat a great idea! I had to buy a specialty gate for a wide opening in my home, now why didn't I think of making one?! Great post!
ReplyDeleteI chose you to pass the liebster blog award on to. Now you can pass it on to others, too! Check out the info here: http://jengerbreadcreations.blogspot.com/2012/04/liebster-award.html
What an awesome idea and great job!!! would this homemade gate work for sectioning off a larger area...say 15-20 feet? How secure is this to the ground?
ReplyDeleteThanks for your question. I checked in with my husband (the brains behind this particular project) and here's what he said:
DeleteOurs isn't directly connected to the ground being connected to studs on one side and drywall on the other. If you wanted to extend I'd recommend using 2x4s and not 1x1s for strength reasons. I'd also make sure that you tie into studs on both sides. Otherwise the hinges/PVC setup should work.
I hope this answers your question!
-Michaela
Hi,
DeleteI had been loooking for a gate around 90" wide and your idea was the perfect inspiration.
My modifications
1. I used a 1"x4" as a continuous bottom board; the wider flat surface provided more stability. The rest was 2"x2" and some left over wood. My plan was to screw in the base wood to the floor but did not need that.
2. I did not use any glue and instead used two 1"x2" strips of wood to hold pipes in place. The 1/2 pipe has close fo 5/8 outer diameter; I made 5/8" holes in bottom strip and hammered the pipes in. For the top I used 13/16" bit and just slid the strip on the pipes. Then I simply screwed in those strips to the top and bottom; this made the structure more strong.
3. I forgot about the cat .. made a 6"x9" cat opening.
Do check the pipes before buying the bits; Homedepot has "Irwin Speedbor 14-Piece High-Speed Steel Classic Spade Bit Set" for 10 bucks.
I would also suggest adding more vertical 2"x2" in the middle for longer gates.
Sounds like a great way to gate off such a large area! I love that you made a cat opening! We have a large opened arch area in our living room that ours have to jump through if the gate is closed. We aren't as nice as you guys! ;)
DeleteThat's awesome!!! I was just hinking that I need a large gate for a 12' space, but they are so expensive. Ill have to get Hubby to make it!
ReplyDeleteP.S. Found you through Pinterest and newest bloglovin Follower
Nice way to create a gate that fits your space! We had a 7'ish opening to our kitchen that we had to keep our kids out of. By using a used baby crib, we created a baby gate that's held up amazing.
ReplyDeleteCheck it out if you're interested: http://thisinsanehouse.blogspot.com/2013/08/the-crib-gate-scandal.html
I love your solution!
DeleteYou should be able to remove the black print on the PVC with nail polish remover.
ReplyDelete