12.07.2013

Three Ingredient Mint Hot Coco for Two


I'm from California. I was raised in San Diego and still think of the Sacramento area as home. I love the snow. But I firmly believe that if there's snow on the ground, I better be in Tahoe with skis trapped to my feet.

Three days after we moved to North Texas, we had the worst snow storm in a century. I felt it was a sign that we should move back home. My husband reminded me about the paycheck in Texas so I begrudgingly decided to stay. The day we moved into our house it was in the 30s, I was five months pregnant, and we had no working heater. Very, very begrudgingly...

Since then, the weather has mostly behaved. We had a small amount of snow last year. It melted by mid day. Well, the weather stopped behaving Thursday. And I'm annoyed. 

Those of you who live in actual cold weather are probably laughing at me. But I'm going to be stuck inside for at least four days with a hard layer of snow, sleet, and ice covering everything. Thankfully I had enough sense to stock up the morning before the storm hit. But my toddler is going totally and completely crazy being stuck inside.

So, the moment I put her down for her nap, I knew I needed a little treat. It's freakishly cold outside {I think 16 is too darn cold!} and I didn't think to buy any decaf tea. I was also out of the wonderful Trader Joe's mint coco mix. 

Well, I improvised. And I'll never make coco another way again!

All you need for two wonderful cups of mint hot coco is:
8 Andes mints
3/4 cup chocolate chips {I used semisweet because it's what I had on hand}
2 1/2 cups plus 1 Tbsp milk, divided


In a small saucepan, melt Andes mints, chocolate chips, and 1 Tbsp milk over medium heat. Stir frequently.


Once chocolate is melted and smooth, add milk 1/2 cup at a time. I found a whisk was the best way to combine everything {I switched to a whisk right after taking this picture}.

Warm to desired temperature.

Serve with giant marshmallows or whip cream.


This creamy mint hot coco takes only five minutes to make and only uses one pan. It's the prefect cold night treat for after you tuck your kiddos in {I'm thinking some peppermint schnapps might be in order}. Trust me, you'll never want to use a mix packet again!  

I know most the country is under ice and snow. I hope you all stay safe and enjoy your "snow" days!


Come party with me!

Tip Junkie, Southern Lovely, Uncommon Designs, Somewhat Simple, Yesterday on Tuesday, House of Hempworths, 52 Mantels, The CSI Project, Serenity Now, Tatertots and Jello, Family Ever After, The Grant Life, Positively Splendid, I {Heart} Nap Time, It's Overflowing

10.17.2013

Sharing at The Ribbon Retreat


Hey guys! I'm super excited to be at The Ribbon Retreat today. I'm sharing Emma's new quilt. Thankfully she's still happy in her crib. But soon she'll be moving up to a toddler bed. We're now ready with a momma made Ruffled Strip Quilt! Stop by and check out lots more pictures and a tutorial!


9.30.2013

Halloween Puppy Chow at The Grant Life


Hi friends! I'm over at The Grant Life today sharing a delicious recipe for Halloween Puppy Chow. My husband has already told me I can't make it again for a long time. He said that while munching on far more than his fair share of this delicious treat. In husband speak, that means it's a real winner!

9.16.2013

Abby Cadabby Style Wand Tutorial at The Grant Life


Hey friends! I'm over at The Grant Life today sharing an Abby Cadabby Style Fairy Wand. My little miss is just in love with Abby Cadabby and this wand! It's so easy to make. Come check out the tutorial!


9.06.2013

My Just Between Friends Fall/Winter Sale Deals {or I really do lovethis sale!}


Last Saturday was my twice a year adventure in massive bargain hunting. I really do love shopping at Just Between Friends Fort Worth. It's the largest sale of its kind in Texas, which is saying something. So, it can be overwhelming. I defiantly feel like I have to be mentally prepared and have a plan. Once I have a list and some coffee, I am thrilled to go out bargain hunting!


I just can't stand how good the deals are! I was able to score an entire winter wardrobe for my daughter (minus a coat...last year's still fits), a pair of brand new sparkly Toms knock offs, and some dress up gear all for $83! You read that right! $83 tinny ones!


So here's this year's run down. I got:
9 long sleeved shirts (three Gap, two Old Navy, one Carter's, one Cherokee, one Circo, and one Oshkosh B'gosh)
2 pairs of jeans (one Gap, one Old Navy)
2 long sleeved play dresses (one Gap, one Carter's with matching leggings)
1 pair of leggings that look like skinny grey chinos (Oshkosh B'gosh)
1 pair Carter's footed PJs
1 ADORABLE lime green polka dot cardigan (Circo)
A big old bag of play jewelry
A tutu
A train conductor hat
A pair of fairy wings
Brand new Grey sequined Circo brand Toms knock offs 
And the grand score...A Cinderella dress with matching new in box shoes and crown (for only $6!)

I anticipate having to pick up a pair of leggings or two, I will make her Christmas dress, and I may (who are we kidding...will) eventually succumb to some cute top on a whim at Target. Other than that, my little one is set for winter. Plus the dress up items are going to be a Christmas present. Winner! 

I am thrilled with my scores this go around. I think it's my best trip to JBF yet! 

Have any of you gone to the half price sales at JBF? I have yet to brave one. I'm worried that all the great stuff will have already been picked over. I would love to hear your experiences!


9.01.2013

Please Excuse the Mess


Hi everyone! I hope you are all enjoying your long weekend. 

I'm currently attempting to update the blog. There have been some hiccups along the way. So please excuse the mess, broken links, and all together silliness of the blog for the next couple of days. Hopefully I'll get my act together soon!

Thanks!

8.30.2013

Appliqued Bib Tutorial {with free pattern!}


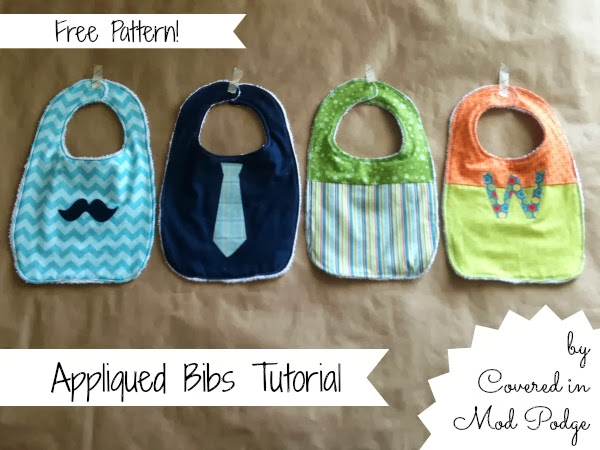
I first shared this tutorial over at The Ribbon Retreat Blog as a part of their Oh Boy! series. These great little boy bibs make excellent baby shower presents. A quick change of the fabric and appliques and these bibs are perfect for the little girls in your life as well.

To make your bibs, first print out the pattern (its two pages) and tape it together. Then, grab yourself a fat quarter of quilting cotton, some heat n' bond, terry cloth, and velcro and you'll be set to make an adorable, appliqued bib!

Download your pattern here. Please remember that this is for personal use only! If you're going to share this pattern, please share the full post and not just the pattern! 

Start by cutting out your pattern. There's two different options with the pattern. The first is to cut a solid piece. The second is to use two fabrics to make up your bib.


Lay your pattern along the fold of your quilting cotton with some pattern weights (or cans of beans if you're cool like me!).


Slowly cut around your pattern using your rotary cutter. If you are using two fabrics, follow the lines on the pattern as to where to cut each fabric.


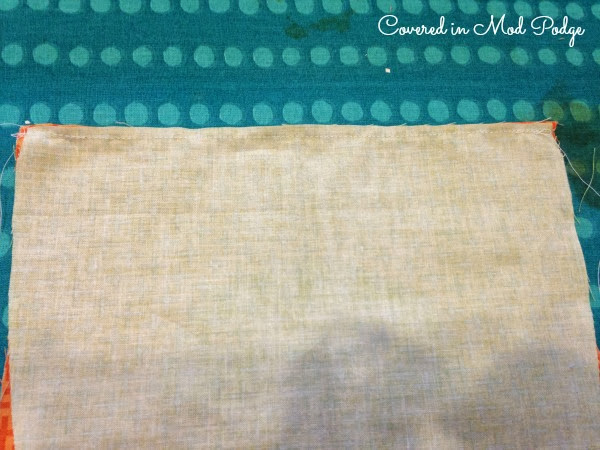
If you're using two fabrics, place the two fabrics right side together and sew them using a presser foot seam allowance. Then, press the seam upwards.


Time for the applique!

There's a couple of different ways to get your applique. You can freehand a pattern, you can print out a template, or you can use a craft cutting machine to cut out your shape.


To prep your fabric for cutting the applique, cut a rectangle of fabric about an inch bigger than your final shape. Then, cut a rectangle of heat n' bond that's just a tinny bit smaller than your piece of fabric. Place your fabric, wrong side up, on your ironing board. Then, place the heat n' bond, bumpy side down (and paper side up) on top of the fabric. Press for about five seconds.

At this point, you can draw/trace your image on the paper part of the heat n' bond and then cut it out. Don't forget to flip the image if necessary! Or, follow your craft machine's instructions for cutting out the shape you want to applique.


Once you've got your shape cut out, peel off the paper backing.


Place the applique on the bib, fabric side up. Now press for about five seconds.


Now, to sew down your applique. Set your machine to a zig-zag stitch. You want the stitch length and width to both be very small. I set my length to 1 and my width to 1.5. Each machine is different so its best to play around on a scrap piece of fabric before tackling your applique.

The name of the applique game is slow, slow, and slower. You have to sew very slowly making a lot of adjustments as you go.


Curves can be a bit of a pain. Looking at this mustache, you can see that there are two kinds of curves- mountains and valleys.


When making an adjustment on a mountain, keep your needle down in the applique. Then lift the presser foot and make an adjustment. You might have to make adjustments every stitch or two depending on how big or small the curve is.


When making an adjustment on a valley, keep your needle down in the fabric. Lift your presser foot, adjust, and keep sewing. Again, you'll need to adjust often and sew very, very slowly!


Now to cut the terry cloth. You can buy terry cloth by the yard at the fabric store. I normally stock up on the cheapo towels at Target when they go on sale. I can get four bibs out of a towel for less than $2!


Instead of cutting a perfect bib out, I fold the terry cloth in half and set the bib pattern a bit in the middle. Then, I cut a general shape. This is because you end up trimming everything down later (that and I'm lazy).


Pin the wrong sides of the terry cloth and the bib together. Make sure you mark a three inch turning gap on the bottom.


Sew the bib using a presser foot seam allowance. Go slowly around the curves and adjust as necessary.


Now it's time to trim. Using pinking sheers, trim close to your seam allowance. Be very careful to not clip the seam. If you don't have pinking sheers, just trim the terry cloth down to the same width as the quilting cotton. Then, clip the curves so that everything will lay nice.

Time to turn your bib. Make sure you get all the curves laying nicely.

Press well, tucking the gap into the bib. Pin. Then, top stitch the entire bib.

Almost done! Cut yourself an inch strip of velcro. Pin one piece of velcro to the right,  top of the quilting cotton and the other piece to the left, bottom of the terry cloth. Stitch down the vlecro and you're all done.


Now you're all set to bib up your drooling, always mess making, adorable little boy! Or, if you're like me an only have a girl, you're ready to gift these bibs as shower presents for adorable, chubby-cheeked future men!


Here's a list of the fabric I used:
Mustache Bib- Bib Chevrons Small in Aqua, Applique Bella Solid in Navy

The Ribbon Retreat provided me with the fabric in exchange for this tutorial. I work with The Ribbon Retreat because the offer a quality product and excellent customer service. If you have any questions, check out my disclosure page. 


8.09.2013

Why I Sell at Just Between Friends Fort Worth {Plus a Giveaway!}


I have shared a couple time about how much I love Just Between Friends Fort Worth. Today I'm sharing with you why I sell my gently used toys, gear, and clothes at JBF. So here's my top five reasons that I sell with JBF Fort Worth!

1. JBF Fort Worth is the largest consignment sale in Texas! It's located at the Will Roger's Memorial Center. And the sale is HUGE! The best way to describe it is that it's like a Costco filled with great deals on wonderful kids' items! Because the sale is so big, people come from all over the area to shop. That means more shoppers to see, and buy, my items.

2. I get more money when I sell at JBF Fort Worth. I've tried consigning my items at a couple of local shops. While they're convenient because they buy year round, I get far, far less from them. At JBF you can earn between 60 and 70% of what you sell your items for (depending on if you volunteer or not). There's a $12.50 consignors fee as well. I average over $100 a sale for selling mostly clothing that my two year old has outgrown that season. I get to buy my daughter everything she needs for the upcoming season plus have money to spare!

3. I love that JBF Fort Worth wants to be a community partner. Its a big part of why I choose to sell with them.

JBF Fort Worth is a great way to give back to back to local community programs. When you tag your items for selling, you can select to either pick up or donate items that were not bought. I've always selected to donate all my items. I figure if I'm trying to sell something, its unwanted clutter in my house. Rather than going and picking up unsold items, having them sit in my house for months, and eventually breaking down and giving them to the Goodwill (whom I wholly support as a wonderful community organization), I'll let JBF do the work for me. At the end of every sale, JBF Fort Worth loads up a big old truck load of items to be donated to some wonderful partner organizations. These organizations help young mothers, victims of domestic violence, and others who could use children's items. You can learn more about who JFB Fort Worth donates to at their websites: Open Arms, Teen Lifeline, and Fort Worth Metro.

In addition to donating to partner organizations, you can also give back through shopping for a child on the Wall of Wishes. The Wall of Wishes is kind of like The Giving Tree or Angel Tree. Local organizations make wishes of items that can be found at the sale. You can purchase the item and JBF Fort Worth will take care of making sure the donations get into the right hands.

4. Kids need some stuff. And kids want stuff. And mommies and daddies think things are cute so they buy more stuff. Don't even get me started on the amount of stuff grandparents buy...even when they're asked to scale it back! JBF time is a great time for me to get a handle on the amount of stuff we have floating around our house. Toys that my kiddo has barely touched? Sell! Clothes that she's outgrown and I don't have a sentimental attachment to? Sell! Ugly outfit I had to keep because my MIL bought it and then the kid wore it once? Sell! I'm not very good about letting go of things. Sorting through all of my kiddo's stuff is a great exercise in letting go of stuff that's just stuff. Sure I hold onto everything that my mom (who passed just before my daughter was born was bought). But I'm learning that cute isn't as good of a reason to hold on to something. Especially when I could make some money!

Which leads me to my last point....

5. I make money! Sure it takes time and effort to get everything ready to sell. I know that my time is valuable. Being a mom and a Master's in Social Work student, I highly value my time. But I think prepping is worth every minute when I get my consignor's check in the mail! We're currently living on one income while I work on my degree. Thankfully, we do not want. Except that I wouldn't mind going to a movie every once and a while. Or a weekend getaway! I pinch pennies and see what ways I can find to bring in some money for entertainment. After I've bought for the next season, there's always some left over from my check. Sometimes its enough for us to go out to dinner. Sometimes it covers a fun outing that we wouldn't otherwise take. But I always feel a sense of accomplishment that I was able to cloth my kid, reduce the overwhelming amount of kiddo stuff in the house, and have some cash left over to treat my husband and I to something wonderful. I know other moms make HUGE checks. Its all about how much you have to sell!

Want to give selling a shot? Check out the selling page over at JBF's website! Want to shop? Let's be honest...who doesn't! Check out the full calender here!

The wonderful people at JBF Fort Worth are offering one lucky reader a $15 gift certificate for use at the Fall/Winter Sale. What the what! $15 goes sooooo far at this sale! Use the Raffelcopter below to enter!

Some details: the $15 gift certificate is valid only at the JBF Fort Worth's Fall/Winter sale. The winner will pick up the certificate at the sale itself. The winner will be notified via email and have 24 hours to respond or a new winner will be selected.

a Rafflecopter giveaway

Folks, this post counts as my volunteer hours. This let's me into the sale a bit early. Also, JBF Fort Worth has compensated me for the post. However, both the opinions and words in this post are my own. I truly get giddy talking about the wonders of this sale. I would not work with them if I wasn't in love. More questions? Check out my disclosure page!

8.06.2013

6.25.2013

Italian Chicken Meatballs Recipe {or a quick and yummy dinner}


I love to cook. But I also am pressed for time. So I love recipes that do double duty {hehe...I said duty. Sounds like dooty. Yes, my humor is as sophisticated as a 12 year old boy's.} or that freeze beautifully. This delicious Italian Chicken Meatball Recipe comes together quickly, freezes like a dream, is a healthier alternative to traditional meatballs, and is tasty to boot!


These meatballs use ground chicken. You could also use ground turkey or even ground beef. I HIGHLY prefer ground chicken to turkey. Ground chicken is moist, and has a more mellow flavor. Ground chicken is also easy to find these days. I picked mine up at Target! Also, these little gems are baked. Frying them in the pan is an option. But to me, baking them is fool-proof. Its so much easier and healthier {no oil}.

Ingredients:
1 lb. ground chicken
1/3 cup Panko bread crumbs
1/2 cup parmesan
1 tbsp. basil
2 cloves minced garlic
1 tsp. crushed red pepper flakes {or more to taste}
1 egg


All all ingredients to a mixing bowl and mix together with your hand.


Shape into balls and place on a greased baking sheet or a silicone baking mat. {I like to use my silicone baking mat so the cheese that oozes out gets all crispy and yummy.} One pound of ground chicken will get you 12 golf ball sized meatballs.


Bake in an oven pre-heated to 400 degrees for about 25 minutes. You can either split one open to make sure its cooked through or use a meat thermometer to check that its at an internal temperature of at least 165 degrees.


If I really have things together, I like to bake these guys during nap time. Then, I throw the meatballs I want to use that night for dinner into a pan with spaghetti sauce {jarred...shhh don't tell}. Then, I simmer them on low until dinner time. If I don't have it together, I just throw them on the plate straight from the oven. They still taste great.


To freeze these guys let them cool on the counter for about 30 minutes. Then wrap them up in tin foil and store in a freezer bag. When I'm looking to use them {meatball subs anyone?}, I let them defrost in the fridge. You can throw them in the sauce to warm up/simmer.


What's your favorite recipe that you freeze? I'm always on a look out for a good recipe that I can freeze leftovers!