4.30.2013

Travel Diaper Changing Pad Clutch Tutorial


Here's a post that I first shared over at The Grant Life.

Do you need a new baby or shower gift that will really wow? Look no further than this Travel Diaper Changing Pad Clutch Tutorial.

Essentially, this tutorial is sewing a bunch of squares and rectangles. While it may look advanced, this is a project most any sewer can take on!

Want to make your own? You'll need:
1/2 yard quilters cotton
1/2 yard PLU
1/2 yard batting/fleece or 1 yard flannel
5 inches sew on velcro
Basic sewing supplies

Alright, let's getting cutting....

From the quilting cotton, cut:
Main body: 24 inches by 17 inches
Closure rectangle: 4 inches by 3 inches
Strap: 17 inches by 2 inches
Pocket: 17 inches by 8.5 inches

From the PLU, cut:
24 inches by 17 inches

Fleece/batting/ flannel, cut:
24 inches by 17 inches
*If using flannel, cut two

Now, to sewing...

{All seam allowances are presser foot unless otherwise noted.}

Start out by ironing all your quilting cotton. You want a nice, neat surface to work with.


Take you closure rectangle and iron it in half, hot dog style, right sides facing. Sew like shown. Make sure you leave a gap along the long side for turning.


Carefully clip your corners, turn right side out, and press. Then, top stitch as close to the edge as you can.


Take one piece of your five inch strips of velcro and pin it to your closure rectangle. You'll want it to be about 1/2 inch down and then centered. Sew it down.


Take the strap piece and press in half, hot dog style, right sides together. Sew along the length of the strap.


Turn your tube and then press. No need to top stitch.


Take the pocket piece and fold top edge {long side} down 1/4 inch towards wrong side and then 1/2 inch again. Press and pin. Sew.


And now you have your pocket piece!

Now its time for lot's of measuring and pinning.


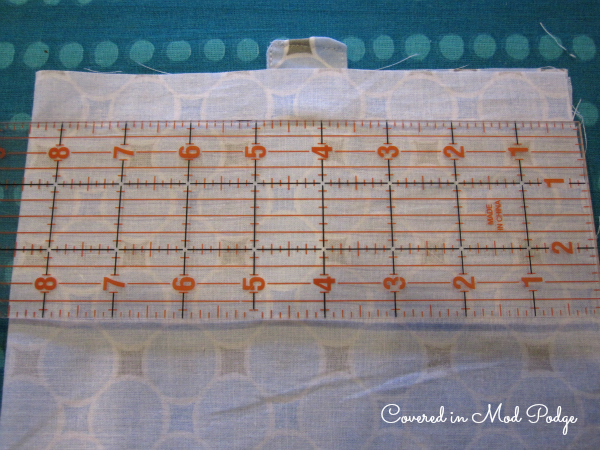
Start out by pining your closure rectangle to your quilting cotton. Center the rectangle on the short, right side of the fabric. You'll want the velcro facing up and like 1/2 inch of the rectangle sticking up. Stitch that sucker down, going back and forth several times.


Now for the other side of the velcro. Center your strip along the short side and then 7 inches up. You'll place the top of the velcro strip at the 7 inch mark. Make sure you are measuring from the opposite side of the quilting cotton from where you put the closure strip.


Let's work on final assembly. Start by finding a clean, smooth work space to assemble all your layers. Lay down your batting/fleece/flannel. Then, lay your PLU down right side up. Smooth like crazy. Now, add you pocket piece at the bottom of the PLU, right side up.


On top of your pocket piece, add your handle folded in half. This will create your loop. Make sure the loop is facing inward and the raw edges are on the outside.


Lay your quilting cotton on top of the other layers. Smooth everything out and pin well. Sew, leaving a 4 inch gap for turning on one of the long sides. When you go over the handle and the closure, back stitch a couple of times to reinforce.


Clip the corners, turn, and press well. Press on the quilting cotton side. Make sure you tuck in the opening where you turned and pin. Then top stitch all the way around.

Sewing on top of PLU is a bear. It sticks. I don't know where I first heard this trick, but tape the bottom of your presser foot {being sure to leave an opening for your needle}. This will help everything move more smoothly.


Then, add a stitch down the middle of the pocket to create a nice divide. Add in a couple of diapers, a diaper rash cream tube, and some travel wipes and you're set.


You end up with everything you need for a diaper change on the go. You can use this clutch for quick trips to the store or so daddy doesn't have to carry around the uber-girly diaper bag.

And here's how it fold up...


Cutting all the pieces takes longer than the actual sewing. Two hours, tops, and you have a wonderful baby shower gift {or a great little treat for yourself}.

It seems like my friends just keep having more kiddos. I'm always going to a shower. What's your go-to shower gift?


Come party with me! C.R.A.F.TMommy By Day, Crafter By NightShwin & ShwinTip JunkieSouthern LovelyUncommon DesignsSomewhat SimpleYesterday on TuesdayHouse of Hempworths52 MantelsThe CSI ProjectSerenity NowTatertots and JelloFamily Ever AfterThe Grant LifePositively SplendidI {Heart} Nap TimeIt's Overflowing

4.23.2013

Posting over at The Grant Life {or another great baby shower gift tutorial}


Come stop by The Grant Life today for a great baby shower gift tutorial that I'm sharing. This Travel Diaper Changing Pad Clutch is easy to make and great for new parents!

4.08.2013

Creative Exchange Link Party {or show and tell}


Alright friends, its time to party! I can't wait to see what wonderful creativity you all shared with your Creative Exchange partner. Be sure to stop by other posts and say hi!

This party is not a general link up. It is designed for participants of the Creative Exchange. Please only post what you sent or received from participating in the Creative Exchange! Thanks!


Creative Exchange Gifts {presents for a new friend}

I wasn't planning on participating in this round of the Creative Exchange. I feel like its a real victory if I've put dinner on the table each night. I get bonus points if its healthy and/or on time. So the idea of adding another thing to my plate seemed daunting. Kismet got involved and I found myself partnered up with the sweet, talented, encouraging Brandy.

Brandy's Pinterest was filled with tote bags. This made my job of figuring out what to make pretty easy. She also said that she loves all things pink and girly.


Done and done. I used this tutorial as a guideline for making the bag. Really, I looked at the pictures and then kind of ran with my own plan. I added a fun little felt flower for good measure.


I included two of my favorite crafting supplies...Washi tape and baker's twine. Really, they're two of my favorite things for just about everything. I seal thank you notes with Washi tape. I use it for seam allowance markers on my sewing machine. I decorate with it. I tie anything and everything with baker's twine. So my hope was that Brandy could get some good use out of these fun supplies too.


Well I broke the cardinal rule of exchanges. I forgot to take a picture of what I made before I sent it. Thankfully Brandy was willing to take a few pictures and send them along.

I'm so glad I participated  I had so much fun getting to know someone I would have never met otherwise. I loved sending off a package of handmade goodies and waiting for her response. Exchanges like this are just so much fun!

Hopefully we'll get another Creative Exchange going late summer/early fall. I hope you'll all participate!

Have you ever participated in an exchange like this? Did you give/get anything that you just love?


Come party with me! C.R.A.F.TMommy By Day, Crafter By NightShwin & ShwinTip JunkieSouthern LovelyUncommon DesignsSomewhat SimpleYesterday on TuesdayHouse of Hempworths52 MantelsThe CSI ProjectSerenity NowTatertots and JelloFamily Ever AfterThe Grant LifePositively SplendidI {Heart} Nap TimeIt's Overflowing

4.01.2013

S'Mores Mix Recipe {or a quick and easy party favor}

So forever ago {last October to be exact} I co-hosted a very fun BBQ baby shower. Not long after I shared with you all the fun little blanket/diaper gift I made. I said I'd share more and eventually came the Hearts on a Sick decoration tutorial. We'll I'm finally going to get to the good stuff...the treats!

When party planning got started, I was tasked with decorations and favors. Someone else worked on the guest list. And then that certain someone failed to mention to me that I signed up to bring favors for 50 people. When I found out that lovely little detail, I set out to find a favor that was quick to make and super affordable. I didn't have a lot of cash to burn on this project.

Enter this wonderful little S'mores Mix. This treat is quick to make, budget friendly, and delicious to boot. It's perfect for kiddo parties but also great for letting adults feel like kids again. Plus it has both chocolate and marshmallows in it. What ever goes wrong when you combine chocolate and marshmallows?

I made 55 bags of this stuff. And I had leftovers. And I had to pay my "helper" {ie toddler} a pretty hefty marshmallow tax to get this done. For all this, I doubled the following recipe.

1 box Golden Grams cereal
1 bag mini marshmallows
2 bags chocolate chips {I used a mix of milk and semi-sweet because that's what I had on hand}

Start out by prepping a pretty big work space. I cleaned my island and then put down wax paper. Make sure you line wherever you're making this mess on with wax or parchment paper or you'll be sorry.


Spread all of your Golden Grams. You'll want to shoot for a mostly single layer of grams.


Next, generously spread out 3/4th of your bag of marshmallow. Add one bag of chocolate chips to the mix.

You'll want to melt the second bag of chocolate chips, reserving 1/4 cup for later use. I used a double boiler. You can use the microwave too. Whatever method you choose, stir often to avoid burning.


Now comes the fun part...drizzling the chocolate. Use a big old spoon or spatula to drizzle chocolate all over your mix.

Unfortunately, my S'mores mix didn't turn out as pretty as the above picture. I had my husband help. And he globed rather than drizzled.


A tear or two later, I decided to run with it. I embraced the messy look and stirred everything up with my hands. Not nearly as pretty, but mighty tasty! While everything was still warm I added the remaining marshmallows and chocolate chips.

Leave everything to cool for about 30 minutes. This will let the chocolate harden.

Store in an airtight container. The leftovers stored in a Ziploc kept for about 5 days.


Want to make it look fancy? Grab some clear treat bags and ribbon from the craft store. I got the blue gingham ribbon from the $1 ribbon bin at Michael's. The bags were around $3 for 75 with a coupon. Break off hunks, add it to the bag, tie a bow and you're set!


My husband, toddler, and I inhaled this stuff. I received some great reviews from party goers as well. I loved that it was quick to make, and very budget friendly. I'm sure it will get made for play dates and parties to come.


Come party with me! Tip JunkieSouthern LovelyUncommon DesignsSomewhat SimpleYesterday on TuesdayHouse of Hempworths52 MantelsThe CSI ProjectSerenity NowTatertots and JelloFamily Ever AfterThe Grant LifePositively SplendidI {Heart} Nap Time