12.17.2012

Poinsettia Wrapping Tutorial


Here's another post I shared over at The Grant Life!

As I said last week, Pinterest can be my best friend and worst enemy. There are so many beautiful wrapping ideas out there. Many of them are time consuming or require tons of supplies {not to mention money}. I like being able to make presents look pretty so I am always on the lookout for simple and stash busting wrapping ideas.

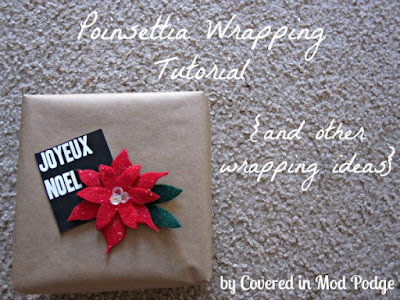
To make this easy poinsettia "bow" all you need is some scraps of red and green felt, hot glue, and something to use as the center {you could use sequins, little pom poms, or felt}.


To make my poinsettia, I used this template. I cut out one of each size from the second page. I kind of winged the leaves. Then, I hot glued the two poinsettia pieces together and the leaves to the back. Quick and simple! I used hot glue to adhere the poinsettia to the kraft paper wrapped present.

Get these cool, chalkboard inspired gift tags here.

Need more wrapping ideas? In addition to the wrapping ideas I shared last week, I am loving these five ideas!


Lisa at ellinee shared how to make these adorable paper bows. She even included three different colors of chevron paper for you to download.


Jan over at Daisy Jane has these great pillow boxes with matching gift tags as a free download. She also provides an easy to follow tutorial.


Bonnie from Coming Home to Roost shared this great faux chalkboard wrapping idea. You can use a regular old white colored pencil to get this awesome look!


Katrina at Splash of Something has a great way for kids to get involved in the wrapping process. What grandparent wouldn't love a string of lights made by their grandchildren!


The Party Studio Blog shared this cute lunch sack wrapping idea. I think this is perfect for packaging cookies for neighbors and coworkers. 

I hope you all have a wonderful Christmas season filled with peace, family, and joy. 

12.10.2012

Easy and Affordable Gift Wrapping Tutorials


Let's be honest...Pinterest is both a blessing and a curse. There are so many great ideas from so many talent people that you can get lost in Pinterest for days. It's also very good at making you feel like a terrible mom, crafter, cook, etc. Everything just looks so dang perfect. What we don't see are the giant piles of laundry and the naked children running around. It's all about staging.

Today, I want to share some simple wrapping ideas. These ideas are quick, easy, and affordable. Most can be made with items you already have in your craft stash. My hope is that you're inspired to wrap something pretty because you enjoy it...not because Pinterest is filled with a million beautiful packages. There is nothing wrong with good old fashion tissue and gift bags.

Last year, my dear friend Liz said she was just going to wrap all of her presents in kraft paper and add some homemade tags. Easy peasy. I loved the idea! So this year I hit the dollar store and picked up a roll of kraft paper. What could be better than a dollar for wrapping tons of presents?!?


Let's start out with the tulle pouf bow. You'll need some tulle, matching thread, and a needle.

I made this bow to cover nearly an entire 9 by 9 inch box. You can adjust your measurements based on the size of your box and how big you want your bow to be.


Cut two pieces of 10 inches by 20 inches of tulle. My tulle was left over from my daughter's Halloween costume. You can get tulle by the yard for like $2/yd at places like Joann.


Stack the two pieces of tulle on top of each other. Double thread about 10 inches of matching thread through your needle and tie a knot at the end. I used white thread so it would be easier for you guys to see.


Stitch every inch or two down the middle of your tulle.


Pull the string tight to scrunch up your tulle.


Keeping your thread pulled very tight, wrap the thread around the middle of the bow. Then, tie it in a knot.


Fluff your tulle bow and trim as needed.


I used a small dab of hot glue to secure the bow to my kraft paper wrapped box.


Do you like the tag I used? Well, you're in luck. Kelley made these very fun tags to share with all of you. Isn't just the greatest!

Now, for the felt gift bow...


I adapted this tutorial from 100 Layer Cake to make a quick and easy felt bow. You'll need a sheet of craft felt, scissors, a ruler, and hot glue.


Start by cutting three 11.5 by 1 inch strips, three 10.5 by 1 inch strips, three 9.5 by 1 inch strips and one 2.5 by 1 inch strip.


Twist both ends of the strip to form a loop. Secure with hot glue. Repeat this process for the all but the 2.5 inch strip. Make the little strip into a circle, securing with hot glue.


Now, stack your bow layers starting with the longest. Mess around with positioning and number of loops. I ended up only using two of the medium and small ones. Once you get the bow the way you like it, use hot glue to secure. Finish the bow with the circle in the middle.


Secure the bow to your package using hot glue. This little bow can be used over and over again. Don't forget a gift tag!

Finally, let's talk circles and string.


To make this simple wrapping, you'll need baker's twine, string, or thin ribbon, patterned paper, and something to cut your circles with. I used my Silhouette. You could also use a circle punch or good old fashion scissors.

Start by cutting out three different sized circles from your patterned paper.


Wrap your twine around your package multiple times, overlapping until you like the look. Secure with a small amount of tape or hot glue.


Now, use hot glue to attach the circles to the string. Add one of Kelley's fun tag and you're good to go!


Remember, this time of year is about unconditional love, joy and family...not perfection. Don't stress if you don't have the time or energy to make every present a masterpiece!

Need gift tags? Check out Kelley's awesome free download here!


12.03.2012

Felt Christmas Tree Tutorial


The wonderful Kelley over at The Grant Life has invited me to contribute to her blog. Each month, I'll be sharing one or two crafty or sewing related posts. Here's the first one I shared with her readers.

My little miss is a little ball of energy  She does not stop. Ever. We already had enough of a problem with our Christmas tree due to our three cats. We can only decorate the top half. Emma is at the age where she's old enough to want to be in the tree all the time but not old enough to understand to stay out of it. Rather than pull my hair out this Christmas season, my husband and I decided not to put up the tree this year.


I still wanted something festive in our living room. Hence, this felt tree. Felt sticks to itself. Emma can go nuts decorating and redecorating the tree. I'm hoping she'll play with it over and over again!

Want to make your own? You'll need:
Green Craft felt sold by the yard. {It's 72 inches wide so you'll only need to buy the width you want. I got 3/4yd just to be safe and had tons left!}
Various Colored Craft Felt Squares
Hot glue
Craft ruler, scissors, and large cutting surface {I used a rotary cutter for cutting my tree}
3m Command Strips

Start out by evening up your green tree felt. Then, cut it to height according to your space {and child's height}. For me, this was 30 inches.

To make the tree shape, you'll start by folding the green felt in half hot dog style.

To explain how to cut the tree shape, I'll give you the dimensions I used. You'll need to adjust these according to your desired height. It helped me to have a picture of a clip art Christmas tree open while I was cutting.


Starting at the bottom, cut in 12 inches at an angle. Next, cut out parallel to the bottom towards the outside 6 inches. Cut 12 inches inward at an angle. Now cut parallel to the bottom 7.5 inches. Cut on an angle 9.5 inches and out 6 inches. Now cut your top point on a 15 inch angle.


Now, its time to make the presents to line the bottom of your tree. I made five different presents.

I made three squares measuring 8 inches by 8 inches, 10 inches by 10 inches, and 9 inches by 9 inches. I made two rectangles measuring 8 inches by 4 inches and 11 inches by 3 inches.

Decorate your packages as you desire. Use hot glue to attach these decorations. Hot glue the presents together into a long strip and then glue them to the tree.


Almost done! It's time to go nuts making ornaments. I used various sized cups and bowls to draw the circles onto my felt. I also cut small rectangles to look like ornament tops. Be sure to use either a marker close to the color of the felt or a disappearing ink pen. If you create decorations for the ornaments, hot glue them on.

Don't forget to make a star for the top of the tree!

Now, use the command strips to attach the felt tree to your wall in several places. You don't want curious hands pulling the tree down.


Let your little one loose to enjoy their new-found Christmas fun!


11.15.2012

Chevron Cheater Quilt Tutorial {or for the love of chevron fabric}


I originally share this tutorial over at The Ribbon Retreat. I absolutely adore how this quilt turned out. Check out how easy it is to make your own!

I'm going to let you in on a secret...quilts scare the living daylights out of me! I have not had a lot of success when it comes to quilting. However, I just adore the look of all the great chevron quilts that have been shared all over blog-land. I have a big old crush on Riley Blake's Chevrons. When I saw the large chevron print I knew I could have the look of a chevron quilt without most of the scary parts of quilting!

Want to make your own? For a"craft" sized quilt {36" X 45"}, you'll need:

1 yd of Riley Blake's Large Chevron {I used the Grey/White}
1 1/4 yd of fabric for quilt back {I used Bella Solids in Robins Egg Blue}
1/2 yd of fabric for binding {I used Bella Solids in Bleached White}
Thread that matches the quilt front, the quilt back, and the binding
Craft sized binding {you can buy this at your local craft store}


As evidenced by the fact that quilts scare me, I am not a quilt expert. I'm going to share with you how I did things. If this process isn't what you're used to, quilt your way! There are a number of quilt tutorials out there that have helped me figure out this process. Check out my quilting Pinterest board for additional tutorials!


There's no need to pre-wash your fabrics. You'll want that bit of shrink to kick in after your quilt is finished. Go ahead and start by ironing all of your fabrics.


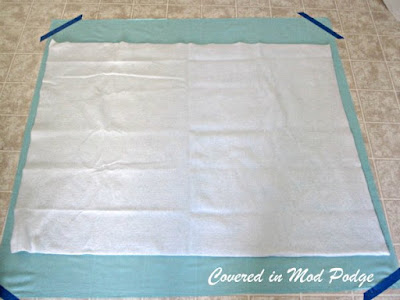
Find yourself a large, clean work space. For me, that was my kitchen floor. Spread your quilt back out, wrong side up. Smooth it out well and tape down the corners. This will keep things from shifting around as you add your other layers.


Next, place your batting in the middle of your backing. There should be extra fabric on all sides of your batting. This allows for things to shift a bit during the quilting process without leaving you in a pinch.


Finally, put your chevron fabric, right side up, in the middle of your batting.


I like to pin baste my quilts. You can find these curved safety pins in the notions area of your local sewing supply store. The curve in them lets you grab all the layers without disturbing the layout. I tried quilting with regular safety pins and it was a big old pain. I highly recommend getting yourself these little guys.


Start pinning in the center of your quilt. Make sure you pin in the middle of whatever colored chevron you're NOT going to sew along.


Keep pinning working your way out from the middle, smoothing out your fabric as you go. You should place a pin every three or four inches. This will keep everything in place while you machine quilt.


You'll want to roll your quilt up to move it to your sewing machine. Roll it in from both directions. This will let you start your quilting in the middle.


You'll want to quilt along the top of one color of the chevrons. I quilted along the top of each of the white chevrons.

Use a thread on top that blends into your quilt top and a thread in your bobbin that blends into your quilt bottom.

Make sure you backstitch when you start your quilting row. Sew down the one side until you get to the point. Keeping your needle down, turn your quilt and start sewing up the other side. You'll repeat this processes until you reach the other side of your quilt. Backstitch at the end, too!


I cannot sew a straight line to save my life. This quilt is very forgiving, as you're not piecing anything together.


Once you've finished quilting, trim all the layers so they are even with your quilt top.


Now, take out all of your pins. I was lazy and didn't do this before I started binding. I broke my first needle because I hit a safety pin. Learn from my mistake! :)


Time to make your binding. Start out by cutting off the selvedges and evening out your binding fabric. Then, cut yourselves 4 strips that are 2.5 inches wide by the length of the fabric.


You'll make your continuous binding strip by joining all four strips together. Start by laying out your fabrics right sides together and perpendicular to each other. Sew a diagonal line from the top left to bottom right corner, making sure to backstitch. Now, cut off the fabric leaving 1/4 inch seam allowance. Repeat this process with the rest of your strips.


Press open all of the diagonal seams. Then, fold your fabric in half, wrong sides together, and press. This will leave you with your continuous binding strip ready to attach to your quilt!


Start pinning your binding to your quilt back. Leave about a 6 inch tail before your first pin. You'll line up the raw edges of your binding with the edge of your quilt. Pin all the way to 1/4 inch before your first corner.


Start sewing your binding to your quilt using your presser foot for seam allowance. Be sure to backstitch.

Stop when you get 1/4 inch from your corner. Leaving your needle down, raise your presser foot and turn your quilt so you sew off the edge. Backstitch! Remove your quilt from your machine.

Now, fold your binding up, using your stitch as a guide. Then, fold your binding down so that it is even with the top of your quilt.

Start pinning and pin all the way down to 1/4 inch from the next corner.


Start sewing 1/4 inch from the corner, backstitching. You just mitered your corner! Keep repeating this process until you have completed all four corners.


Stop sewing your binding when you're about 10 inches from where you started. Backstitch and remove your quilt from your machine.


Fold each side of the binding back on itself so that they meet in the middle. Using a fabric marker, mark 1/4 inch on each side of the binding.


Open up both sides of the binding and pin together. You'll have to fold your quilt a bit to be able to do this.

Now, sew the bindings together. You'll use that 1/4 inch mark as your seam allowance.


Trim along the 1/4 inch line and then press your seam open. Fold everything back up and pin the rest of the binding to your quilt.


Sew the last bit of your binding down.

You've made it to the home stretch! Now its time to sew your binding to the front of your quilt. Make sure your top thread matches your binding and your bobbin matches your quilt bottom.


Fold your binding over and pin well. Pin really, really well. Pin every inch. There's a lot of layers here. Things will be less likely to shift on you if you pin really well. Did I mention that you should pin well?


Pinning your corners requires a little bit of finesse. Bring your binding up towards the front. Then, wiggle the corner of your quilt into the corner of the binding. Pull the first side down and then fold the second side over and pin.


When sewing your binding, you'll want to move your needle all the way over to the left. Sew as close to the edge of the binding as you can. Go slow so that you don't accidentally slip off the binding.

When you get to a corner, sew until your needle first enters the other side of the binding. Then, with your needle down, turn your quilt and continue sewing.

Be sure to backstitch at the beginning and the end of the quilt!


Throw that bad boy in the washer with just a little bit of detergent. After its dry, enjoy all of its crinkly goodness!


I'd love to see any quilt you make using this tutorial. You can email me at coveredinmodpdoge {at} gmail {dot} com.

The Ribbon Retreat provided me with the fabric used for this quilt in exchange for me writing this tutorial. You can check out my disclosure section if you have any questions!

I'm linking this bad boy up as my entry for The CSI Project's Favorite Project of 2012 Challenge.


Come party with me!