1.09.2012

Just a Moment Monday {or introducing...}

{source}

I feel like there is a culture in blog world that causes many to project a perfect picture of life. I'm defiantly apart of this culture. Its like we are afraid that complete strangers might see our messy living room or our complete craft fail. Some of it is bad craft after bad craft doesn't make for a good blog read. But, I think it also comes from attempting to find belonging in this vast blog world.

I started blogging during a break from my MSW program. Between changing diapers and watching reruns, I needed to do something to make me feel accomplished. So, I started crafting more. Then, I needed some sort of feeling that these little projects had meaning. Blogging has been a way for me to validate the current state of my life. It has also allowed me to feel connected to a community. 

As a result, I've been scared to show mess ups. I'm afraid people won't like me if they know how bad I am at cutting in a straight line {and I'm fairly certain they won't like me if they saw the pile of dishes in the kitchen!}.

And in that spirit, I'm going to take a bit of time each Monday to share a rant, ask a question, or show you just how messy my craft table is this week. I hope its a welcomed addition to this little blog of mine. And, I hope it helps me seek a little less perfection when it comes to participating in the blog world.

1.04.2012

Gooey Yumminess {or you should really make this!}


Amy over at Nap Time Crafters was increadilby kind to have me over this Holiday season. I shared a wonderful little breakfast number that is way better than the ease would indicate.

Gooey Yumminess
I love breakfast. I love it so much we make it for dinner sometimes. And I really love the awful for you sugary goodness breakfasts. Enter Gooey Yumminess. Its a recipe I've been fiddling with for awhile now to get just right. I think I've got it, if I do say so myself!

The best part about Gooey Yumminess? Its so easy. There are few ingredients, it uses pre-made biscuits, and it comes together in a snap.

Gooey Yumminess
{adapted from All Things Delicious}
1 tube Pillsbury Grands biscuits 
4 tbsp. melted butter, divided
1/2 cup corn syrup
1/2 cup brown sugar
1 1/2 tbsp. cinnamon
{Serves 4}


Preheat the over to 375.


Mix the brown sugar and cinnamon in one bowl. Stir together 3 tablespoons of the melted butter and the corn syrup in another bowl. Add the liquid into the dry ingredients and stir until well combined.

Spray the living daylights out of your pan. Them spray it more. Corn syrup is a sticky moster. The original recipe calls for making this wonderfulness in a fluted pan. I would recommend doing so. I just don't because I don't have one. 


Spread 1/3 of the gooey mixture evenly on the bottom of the pan. Arrange the biscuits into a circle. Then, evenly distribute the rest of the goo. Finally, drizzle the remaining 1 tablespoon of butter on top of the gooey wonderfulness.

You'll pop this puppy into the oven for 30 minutes. When you check it, make sure you stick a fork down into it and really check the middle of one of the biscuits. The top can look wonderful while the inside is still uncooked.


Once done, invert onto a plate and enjoy! For a memorable meal, serve with fruit, eggs, and juice!


Yumm


Come PARTY with me!

1.01.2012

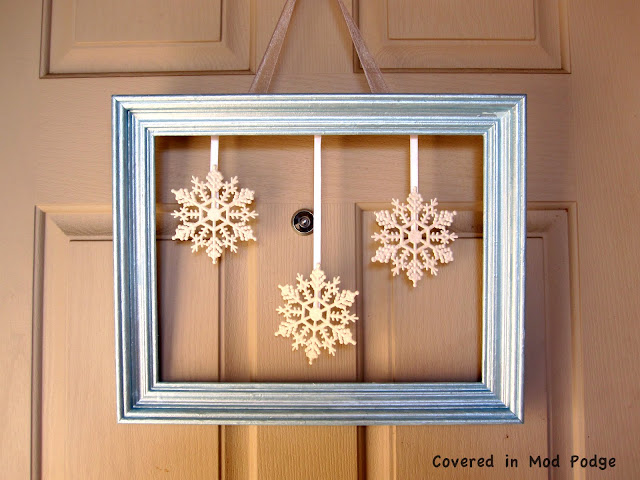
January Wreath {or what's a frame doing on your door?}

Happy New Year everyone! I hope you have had a wonderful holiday season.

Being the first of the month, its time time for a new wreath on my door. This wreath came to fruition through the design collaboration of my husband and I.

A couple of weeks ago, I asked the husband if he wanted to help figure out the January wreath. He sarcastically asked if there was going to be a meeting. So I sent an evite for a design meeting, complete with food {ie our dinner}. I made him pay for his sarcasm with discussing colors and possible design ideas. Take that husband!


What we came up with was a simple snowflake design. We've always lived where winter just meant cold. Moving to Texas, I quickly learned it could mean snow too. So I {...I mean we} decided to run with that fact.


Using a picture frame as a wreath form was inspired by this little number over at Blue Cricket Designs. The picture frame was a truly hideous little number that I got for twenty five cents at a garage sale {I forgot a before picture}. Because of how thin the blue paint was, I used a coat of white enamel as a primer. 


Now I can't take credit for the pretty color. This was the husband's idea.


These little snowflakes came in a four pack from Target for $1 {before Christmas}. They were meant to be present decorations. I picked these suckers up after seeing Jen's amazing Let it Snow framed wall art over at My Own Road. 


I cut off the silver string and then hot glued white ribbon to the back of the snowflakes and the back of the frame. 


And ta da...a non-traditional wreath that was created as apart of a collaborative design process. I think the husband learned his lesson. And he actually had some great ideas!


Come PARTY with me!

This post was kindly featured at:


12.28.2011

Guest Post at Nap Time Crafters {or so very yummy}

Today I'm guest posting over at Nap Time Crafters. I'm thrilled that Amy has invited me to be apart of her amazing blog. 


I'm sharing a yummy New Year' Day breakfast recipe. I hope you come visit!


12.20.2011

Handprint Ornament {or painting with a baby}

Both mine and my husband's families have traditions of giving each other ornaments every year. There's some debate about when these ornaments should be exchanged. Regardless of this debate, my husband and I now exchange an ornament each year. With the birth of the little miss, we knew we wanted to continue this tradition with her.

I got my inspiration of her first ornament from Mandy at a sorta fairytale. Her handprint ornament for her little man was stunning. I loved the simplicity of it. I decided to take my own messy spin on it.


I used white ornaments from Hobby Lobby {they were out of clear two weeks in a row...ugh}, a crimson acrylic paint, a glass paint marker, and lots of wipes to clean up.


I stuck a sans clothing little baby in her high chair and armed myself with a paint brush and an assistant {thanks Auntie Liz!}. After painting her hand and plopping it on the ornament, the above is what I got. Craft fail!


Luckily, I had five more. Round two went much better. I liked it so much that I used two more to give to the grandparents. There was lots of cleaning up baby, myself, and my assistnat. After they dried, my assistant {who has way better handwriting skills than I do} added "{little miss} 2011" to the other side.


All it needed was a cute little ribbon and it was ready for the tree.

Come party with me!