

I shared this fun tutorial over at The Grant Life. I wanted to make sure you all got the chance to check it out!
We moved from California to Texas when I was five months pregnant. We had our little miss in a strange city and away from family and friends. I was very blessed to have a couple of women bring me meals, get me out of the house, and keep me company during wonderful and hard transition into motherhood.
One of these sweet women recently had her second little boy. She asked if I could make her a car seat canopy to keep her little man warm on cold winter days. I was only too happy to oblige!
Want to make your own? You'll need:
1 1/4 yd outside fabric
1 1/4 yd inside fabric
4 1/2 yds jumbo ric rac
1 inch covered button kit
6 inches of velcro
Start out by prepping your fabric. You should wash and iron your fabric before cutting, as this is something that will be good friends with the washing machine.
I like to do all of my cutting at once. Start by cutting your two pieces of fabric down to 36 X 41 inches. Cut two 8.5 X 10 inch pieces the inside fabric for straps. Cut two circles of your main fabric for the covered buttons. Follow your kits instructions to make your fabric covered buttons. Cut a 6 X 8 inch rectangle from both the main and inside fabric for the flap. Also, cut your velcro into two 3 inch strips.

Now its time to get down to business. Place your main and inside fabrics right sides together. Make sure they are the same size and lined up perfectly. Use a bowl as a template to round the corners.
Sandwich the jumbo ric rac between your fabrics, pinning the curves well. Make sure you mark a four inch gap for turning.
Sew using a 1/4 inch seam allowance.

Turn and press, pinning your gap closed. Top stitch as close to the edge as you can.

Now its strap making time. Fold the strap hot dog style with right sides together. Sew using 1/4 inch seam allowance. Make sure you leave a gap on the long edge for turning.

Carefully clip the corners and then turn and press. Top stitch as close to the edge as you can. Sew your velcro as pictured.

Then, hand sew on your button on the part of the strap that will be on top. Repeat for the second strap.
Next its time to make your flap. Place the two 6 X 8 inch rectangles right sides together. Be mindful of print directions if you have directional fabric. Sew with 1/4 inch seam allowance, leaving an inch gap for turning.
Clip corners, turn, and press. Then, top stitch as close to the edge as you can.

Ok, now its time to cut out the window. Measure 14.5 inches in and 14.5 inches up on your main fabric. This is where you'll mark out your window. Using disappearing ink, draw a 2 X 4 inch rectangle. Then, draw a 3 X 5 inch rectangle around the small one. Draw a line connecting the corners of your big and small rectangle.

CAREFULLY cut out the small rectangle. Then, cut along the lines that connected the corners. Make sure you don't go past your outline of the large rectangle.
Turn the edges of the small rectangle in, using the large rectangle as your guide. Press well and pin.

Now, top stitch as close to the edge as you can.

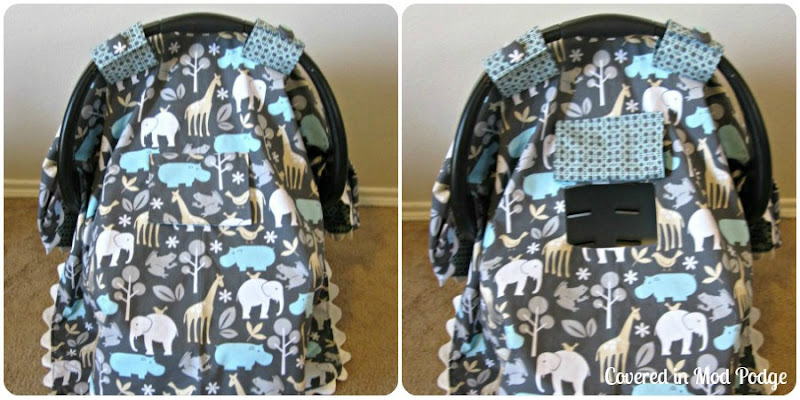
Time to add the flap to your window. Center your flap over the window, placing it 1/2 inch above the opening. Sew down only the top. Keep in mind, whatever fabric you have on the bottom of the flap will be what shows on the canopy when you've got the flap open to peek on your sweet little baby.
Its best to use your car seat to measure where you'd like to attach the straps. I only had access to my giant Britax, so I more or less winged it. I sewed them about 20 inches up and 12 inches in. This seemed to work well both on my giant Britax as well as the more reasonably sized Graco car seat that this little man rides in.
Really, this is a great sewing project for a beginner. Mostly, your sewing rectangles. The hardest part is sewing in the window. I promise, it isn't hard at all!

Happy Sewing!

Come party with me!
C.R.A.F.T, Mommy By Day, Crafter By Night, Shwin & Shwin, Tip Junkie, Southern Lovely, Uncommon Designs, Somewhat Simple, Yesterday on Tuesday, House of Hempworths, 52 Mantels, The CSI Project, Serenity Now, Tatertots and Jello, Family Ever After, The Grant Life, Positively Splendid, I {Heart} Nap Time, It's Overflowing
What a cool project (and great gift idea)! I'm visiting from the grant life. Thanks for sharing your "B felt flower monogram" letter too! We're moving soon and I think this easy project will need to be added to the project list ;)
ReplyDeleteTygre
lightofmineshine.blogspot.com