1.11.2016

Banner Adventure Swap Mini Quilt {or swap addict}


I've become a little too hooked on Instagram Swaps. I mean, they're just sooooo cool. You get to see a whole group of creative people running with a theme. You get to stretch your limits in making something for another person. Plus, a complete stranger stalks you and then makes something for you. Ok, that last part sounds a bit creepy. But it's awesome!

Last fall, I participated in a super cool swap hosted by @the_tattooed_quilter and @kidgiddy. It was a banner swap using April Rhodes fabrics. You had to use April Rhodes fabrics and include yarn, leather, beading, wood, or other dimensional items into your banner. Plus, you had to include a way to hang it.

This was my first time making a mini quilt. I was a much bigger fan of the mini than the full sized thing. Except for the small piecing thing. That sucked.


I went with a herringbone block. I wanted to feature a bunch of different fabrics. My {original} partner requested that I used fabrics from the Bound line. I read Stitched in Color's Herringbone Block tutorial and then just kind of winged it. I'm impressed how well my hoping for the best plan turned out.


I quilted using a similar wing it approach. I just did random wavy lines. Part way through I decided I wanted some contrast. So navy wavy lines happened.


I used braided yard and some fabric tabs to make the banner wall ready.


My original partner dropped out. So at the last hour I ended up sending this banner off to another participant. I sure hope she's enjoying it!

I may have gotten a little too hooked on IG Swaps. I'm signed up for way too many swaps: aprons, tote bags, Parks and Rec, Fancy Forrest, Music Lyric, probably another one I'm forgetting....oh dear! I need to get organized! Want to see my crazy swapping on IG? You can follow me @michaelamcbrown.


1.08.2016

Photos of a Family of Four {or the beauty that is TEXgiving}

The week before Thanksgiving we revived one of my favorite traditions...TEXgiving. TEXgiving started the first thanksgiving we lived out here. My best friend and her little brother came and joined us for a weekend full of football, food, and watching a very, very tall 17 year old guy scare the living daylights out of Emma.

It's been a few years since TEXgiving had worked out. This time, that 17 year old boy came down from the University of Kansas where he's a senior. Ikes! I swear he's still 8! Oh, and Emma loves him! Wesley was even lukewarm.

The best part of this trip? A girls day! With kiddos at school or daycare, we ran errands, had an uninterrupted lunch, and day drank while we got manicures! Seriously...so amazing!

Plus, the ever talented Auntie was generous enough to take a break from vacation and put on her photographer hat. She got the first real family photos of our family of four. And I cried when I saw them. She caught these little moments that I am going to be forever grateful to have. She found silly faces from Wesley, a look that Emma always gives, and the sweetest interaction between a daddy and his little girl. My heart just bursts!

Ok, prepare for a picture overload from Elizabeth Cavagnaro Photography.


We also got a rocking Christmas Card out of the photo shoot!


11.16.2015

Christmas Tree Pillow Tutorial

This tutorial was originally shared at The Ribbon Retreat. I recieved the materials in exchange for this tutorial. All ideas and opinions are my own.


I feel like I am never quite done decorating for Christmas. We don’t tend to gussy up every inch of our home. But there’s always some small touch I want to add. These Christmas Tree Pillows are great because I can easily move them around to add a Christmasy touch to whatever room needs it. I’ve had them on my faux mantel. Right now, they’re giving my TV stand a much needed dose of Christmas Spirit. They may have also been involved in a toddler pillow fight!

What I really love about these pillows is how your fabric choice can let you match any Christmas décor. You can easily adjust for traditional, modern, vintage, whatever! Also, they don’t require a lot of fabric, and they are a quick sew.

Want to make your own set of three adorable Christmas Tree Pillows? You’ll need:
Little Fattie Pack {Aspen Forest by Basic Grey for Moda}
1 yard of coordinating fabric for backing {Shades by Riley Blake in Snow}
Thread
Poly-Fill {From local craft store}
Rotary cutter/ self-healing mat
Disappearing ink pen


To start, press all your little fatties. Then, cut up each little fattie into three inch strips {there will be leftovers}. You’ll want to cut selvedge to selvedge.

Now, determine which fabrics you want to have on each of your trees. I used three fabrics for each tree.


For your smallest {10 inch} tree, you’ll need 5 strips. The medium {12 inch} tree needs 6 strips. Finally, your largest tree {14 inch} needs 7 strips.


Once you arrange your fabrics in an order you like, you’ll sew your strips together. Make sure you are mindful of fabric pattern directions. Sew selvedge to selvedge, using a presser foot seam allowance. Keep adding strips until you have enough for your tree.

You’ll cut all your trees the same way. I’ll give you the description using the small tree’s measurements. I’ll give you the measurements for the other two after the description.


For the small tree, you need to cut an 11 by 9 triangle. Make sure you measure on the wrong side of the fabric. Starting on the bottom right {past the selvedge}, make a mark at 0, 4.5, and 9.

Draw a dashed line vertically at your 4.5 {center} mark.

Now, measure up 11 inches on a diagonal from your 0 mark to meet your center mark. Draw a line. Do the same from you 11 mark to you center mark.


Use your rotary cutter and quilting ruler to cut out your triangles along your line.

For the medium tree, you’ll need to cut a 13 by 10.5 triangle.

For the large tree, you’ll need to cut a 15 by 12 triangle.


I decide to be lazy with the backing. I put the triangle down on the backing and just cut a quick, general shape. You could always cut the backing out the same way as the front.


Now lay the front on top of the back, right sides together. Pin, marking a three inch gap. Sew your tree using a presser foot seam allowance. Make sure you leave the turning gap.

Trim your tree down to the seam allowances. Clip all three corners.

Turn your tree right side out, carefully poking out the corners with a chopstick {or other such tool}.

Repeat this process for your medium and large trees. Then, go to town stuffing them with Poly-Fill. Make sure you really get some stuffing wedged into each corner. This will make sure your trees have a nice shape.

Once stuffed, you’ll want to hand sew your gap closed. This should be done using a blind stitch. I am terrible at hand sewing. But Amy over at Positively Splendid has a great tutorial to use!


Now you can make yourself a forest of Christmas Tree Pillows. I want to try making a 6 inch tree and turning into a Christmas ornament next!


 I hope you all have a wonderful Christmas and a joyful New Year!

10.06.2015

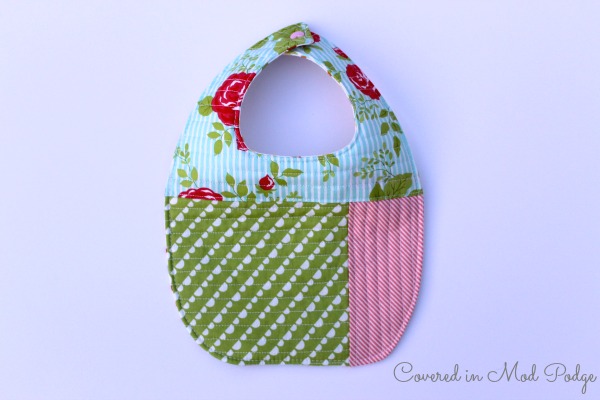
Quilt as You Go Baby Bib Gift {or missing home}


I lived with three wonderful girls in college. They were nothing short of the best roommates I could have ever hoped for. They were a large part of what made my college experience. And they're part of what's really hard about living half a country away from family and friends. I have missed one of my roommates falling in love and getting engaged. And recently I missed the birth of another's sweet baby girl. 


It was very hard for me not to have them around to meet Emma and Wesley when they were born. And it hurt my heart overly hormonal postpartum heart to not meet Erin's tiny little arrival. So, emotional sewing seemed in order.


I used Simple Simon and Co's wonderful Quilt as You Go Bib tutorial. I didn't have any printer ink so I just traced one of Emma's old bibs as a pattern.


The fabrics all came out of my scrap piles. The vast majority are various Bonnie and Camille fabrics. The cross stitch looking flowers are from Riley Blake.


I'm still swooning over these sweet little heart snaps. I want to add them to everything!


Oh, and I made a bow for good measure! Because...why not!


9.18.2015

Narwal Skirt {or a 45 minutes quest for sanity}


I was having a no good, terrible, horrible, very bad day recently. It probably wasn't that bad. But sleep deprivation and tiny army of small people trying to drive you insane have a way of making things seem worse. So, I took a time out. I didn't have a lot of time. Just 45 minutes before the requirements of life caught back up to me. But I knew I would feel better if I accomplished something enjoyable during that time.


So, I busted out the sewing machine. I had thrown these two fabrics in the wash with my Color Blocked Peasant Dress fabrics on a whim. I'm so glad I did. I had a 1/2 yd cut of the narwals and 1/4 yd of the floral from forever ago. The fabrics are both from Out to Sea by Sarah Jane for Michael Miller.


Emma was taking her rest time {ie the hour where I hope and pray she'll actually take a nap but instead just kicks the wall and playing "Training Dragon" in bed}, so I couldn't measure. The skirt is a little shorter than I would normally like {would have been perfect if I had made the skirt when I bought the fabric like 18 months ago!}. When I make her clothing, I like to add extra length. She's so stinking skinny that it extends the life of the garments that I work so hard on {shhhh...don't tell her this one was so quick}. 

As soon as she got up, she wanted to try it on. So we went outside an snapped a few pictures. Her ideas of posing these days are hilarious!