1.28.2015

Cloth Diapering 101: Why We Chose Cloth


With our second baby on the way, I've been sorting through all our baby stuff. I've been thinking about what worked for us, what didn't, and what all we might need this time around. One thing that defiantly worked for our family was our choice to cloth diaper.

Now cloth isn't for everyone. And I have no desire to start some one way to doing this parenting thing is better than another way debate that does nothing but harm. I do want to share why it worked for my family and answer any questions those who are curious about cloth might have.

I'll start out with why we decided to cloth diaper:

1. Cost: When we had Emma, I was in grad school and we were living off one income. We knew part way into her diapering life that I would have to be out of the home for 20 hours a week for an unpaid field placement. We set out in this parenting thing with a thrifty plan in mind. With some saving and the generosity of family and friends, we were able to build up a great stash. It just made so much more sense to spend some up front rather than a ton over the long run.

2. Longevity: We intended to have a few children from the get go. Friends had shared that they were on their second or third kid with the same diapers. This reduced the cost even further!

3. Reliability: Cloth has a reputation of dealing with super pee-ers and blowouts like no one's business. And I can attest to this. We never had a blowout in cloth. When we used disposables {traveling or at daycare}, that certainly wasn't the case. Emma peed like it was her job. The ability to adjust the absorbency of cloth also meant fewer leaks.

During my time with cloth, I discovered:

1. Less Diaper Rash: Emma would rash very quickly in disposables. It didn't matter what kind. If she was in them overnight or more than a day at a time she had a rash. She did get the occasional rash in cloth. But, judging from what other moms said, Emma had far fewer rashes in her cloth compared to disposable diapered babies.


2. Cute Factor: Cloth is just plain cuter. It was fun to match diapers to outfits. No need for a diaper cover when you can just throw a coordinating diaper under a dress. While I doubt this would be a deciding factor for anyone in choosing cloth, it sure is a nice perk!

3. Earlier Potty Training: There's a lot of anecdotal evidence to suggest that cloth wearing kiddos potty train earlier. Emma potty trained right at 25 months. She expressed interest and we ran with it. Who knows if cloth is really the reason she trained at 2. But I do know that she would tell us when she had a wet diaper in cloth. She did not do that when we had her in disposables. I figure that increased awareness is helpful for potty training. That's not to say her skin was wet when I changed her.

I'm going to spend the next couple of weeks sharing tips and tricks for cloth diapering. Have you considered cloth diapering? Are there any questions you want answered?


Here's some places I like to party at:

1.22.2015

DIY Custom Back Tab Curtains {or finally finishing the nursery}


This post was originally shared over at The Ribbon Retreat. I was provided with the materials for this project in exchange for my tutorial. Please see my disclosures page if you have any questions.

My life has been one giant change after another in the last six months. One of those big old changes was my husband and I buying our first house. These great curtains are currently hanging out in my daughter's closet. But they really completed her old room {along with her Ruffled Strip Quilt Tutorial and Magic Pillowcase Tutorial}!


I was on the lookout for curtains for Emma's room since I first put the nursery together. However, I never found the right look within my tiny budget. Making my own curtains opened a world of fabric options to me. These curtains only require sewing {mostly} straight lines. You honestly spend more time pressing than sewing. Anyone can make these! Plus the ribbon tabs give your curtains the custom curtain look without the expense of custom bought.

Want to make your own? You'll need:

Fabric for curtain panels {Lime Scrumptious Dot}
1/2 yd fabric for ties {Pink Bias Stripe}
Pattern for ties
2 1/4 inch grosgrain ribbon
Sewing machine and basic sewing supplies
Hot glue/gun

Let's start by figuring out how much fabric you'll need. Measure from the top of your curtain rod to the ground. Add 2 1/2 inches {for the top seam}, 4 1/5 inches {for the bottom seam}, and 1 inch {for gathering} to the curtain height. So you'll need to add a total 8 inches for seam allowances. You'll need this much fabric, per panel.

Pre-wash your fabric. Cut to the appropriate length. Then, press well.

Only a toddler and assorted cats are likely to see the back of the curtains. That makes everything much quicker. You'll get to utilize the selvedges to your advantage.


We'll start with the long {in my case 3 yard} seams first. Press your selvedge wrong sides together {about an inch} all along the length of your fabric. Pin occasionally to keep everything in place.


Sew along your selvedge, making sure to backstitch at the beginning and end. Repeat for each side of each panel.


Now on to the top seam. Press the top down 1/2 inch and then down another 2 inches.


Sew, making sure to backstitch.


For the bottom, I like a wide hem. Press the bottom up 1/2 inch and the up again another 4 inches. Sew.


To make the ribbon tabs, I cut 3 inch long strips and then heat sealed the ends. I spaced the ribbon tabs every 4ish inches along the top of the curtain, using seven per panel.


Use hot glue to secure the tabs, creating a pocket for your curtain rod to fit through. Make sure you secure your ribbon at the top of the panel {NOT as I pictured. Trust me, it will turn out wonky if you glue as pictured. Not that I would know from experience or anything!}.

Hang your first curtain panel to make sure your measurements worked out right. Once you're sure everything is prefect, sew up the rest of your panels.

Now for making the ties. Emma's room has tinny {40 inch} windows. Therefore, I used one panel per window and tied in the center. You could used this same bow pattern for tying back two panels to the side.

Download the pattern for the bow. Cut out four per bow.

Place two pattern pieces right sides together and pin. Sew, going slowly around the curve. Leave the bottom open.


Clip carefully along the curve. Then, turn right side out. Press well.


On one bow piece, fold about 1/2 inch of the bottom in. Press. Slide the unfolded bow piece about 1/2 inch into the folded bow piece.


Sew along the fold, securing the two pieces together.


Tie in a knot around your curtain and you're set!


Making your own curtains opens a wonderful world of fabric options to you. It's also much easier than you would think!


So here's the big question. Emma's room is now a beautiful aqua {Benjamin Moore's Icing on the Cake}. Do I put these fun lime green curtains back up?


1.20.2015

Yo-Yo Pattern Weight Tutorials {or changing my sewing life}


This post was originally shared at The Ribbon Retreat. I was provided the fabric in exchange for my tutorial. See my disclosure page if you have any questions.

Every once and awhile I come across a sewing tip, trick, or tool and wonder how I ever sewed without it. Pinking sheers! I mean how crazy was I for sewing without them for years! Pattern weights are defiantly on this list.

Pattern weights eliminate the time consuming practice pinning pattern pieces to your fabric before cutting. They make cutting with a rotary cutter a breeze. I've cut out a couple of patterns since these little gems came into my life and my mind has been blown!

You won't believe how affordable and easy pattern weights are to make. You'll need to pick up 5/8in washers from the hardware store. Mine were 44 cents a piece. You'll need 2 per pattern weight. Affordable and incredibly helpful...that's my kind of project!


So, to make 5 pattern weights, you'll need:
10 5/8in washers from the hardware store
3 fat quarters of coordinating fabric (I used Turquoise Raindrops, Natural Raindrops, and Navy Springtime Flowers all from April Showers by Moda)
Hand sewing needle and thread
3/4 inch covered button kit
Hot glue gun/glue


Start out by taping your washers together, two by two. This will keep them from wiggling around inside your pattern weight. Washi tape or painters tape work great for this.


Next, cut out five 4 inch circles from your fabric. I used a mug to trace. Vary what fabric you use. I made two circles of the first two prints and one circle of the final print.


To make the Yo Yo, you'll run a loose gathering stitch {by hand} about 1/4 inch from the edge of the entire circle. Double thread your needle and knot the end before you start sewing.


When you get back to the start, gently pull the threads until a cup forms.


Slip your taped together washers into the pocket.


Gather the thread tightly to close your Yo Yo. Knot off the thread and trim your thread ends. Repeat till you've finished all five Yo Yos.

Now, follow the directions on your covered button kit to make the five covered buttons.


Hot glue a coordinating button on top of your. Be generous with your hot glue, making sure you get all the loose ends of the fabric covered by a button.

Repeat for the rest of your pattern weights.


Then, go forth and have your sewing life forever changed!


Happy Pattern Cutting!

1.15.2015

Best Reads of 2014 {or diving back in}


I've always been a head in the books type of girl. I was a veracious reader as a child. My teen years were spent reading through nearly every list of "classic" literature and "must reads for well educated individuals." Looking back, I was kind of a teenage literary snob {and probably a bit of a terror because of it}. However, I discovered some of my favorite books and genres during that time.

In college, I lived for summer break. I couldn't read for pleasure during the school year. As a Sociology major, I was often reading 1,000 plus pages a week {and that was selectively ignoring less important reading}. I just couldn't bring myself to look at another word on a page when I made it through my class readings. When grad school started, I promptly returned to my ignoring personal reading ways. After hours of peer reviewed journal articles, TV sounded so much better than a book.

Since graduated in August, I have rekindled my love for books. And man, it feels good.

I love seeing what other people are reading. It opens me up to books I may have never head of. So, from time to time {because we know I'm too irregular of a poster to do anything monthly} I'm going to share what I've been reading. I figured I'd start off with books I would recommend from my 2014 reading.

Contains Affiliate Links.


The Fault in Our Stars by John Green

I ran head first the teen lit genre during 2014. It's probably because I so fervently ignored it when I was a teen. Like nearly every other woman on the planet I read, and promptly fell in love with, The Fault in Our Stars. The whit was top notch. Really, I reminded me of amazing banter from Gilmore Girls. And I was smitten.

Looking for Alaska by John Green

I may or may not have read everything John Green ever wrote after I finished The Fault in Our Stars. Looking for Alaska was by far my favorite of the rest of his cannon. Really, I think I was drawn to this book because of my experience working with pre-teens and teens as a school social worker. I found it an artful look at huge topics like grief, guilt, and forgiveness for those who are left behind when a suicide occurs. The characters seemed genuine and enduring, despite the expected teen angst. If you have teenage children, I cannot highly enough recommend that you read this book together. An open dialogue about these tough issues can make all the difference.

If I Stay by Gayle Forman

Mia is a Cello prodigy with the kind of family every teen dreams of. Tragedy strikes and Mia is left with an impossible decision. The perspective of this book is what makes it a worthwhile read. The book is written from the perspective of Mia watching over herself in the hospital. The book goes back and forth between the day of the accident and stories of the past. These stories develop the rich characters of Mia and her family and friends.

Where She Went by Gayle Forman

I was so glad to find out there was a sequel to If I Stay. The ending had left me wondering the what and why of the decision. This book answers those very questions. While its missing the unique perspective of the first novel, I think its a worthwhile read. There were tough answers rather than a trite happily ever after.

A Long Way Down by Nick Hornby

Nick Hornby is such a fun author. I was a big fan of About a Boy. A Long Way Down tells the story of an unusual group of characters brought together by a reverse suicide pact. The characters are all unfailingly human. Even the annoying ones are endearing. A movie based on the book released in Britain in 2014. Do yourself a favor and read the book but skip the movie!

Yes Please by Amy Poehler

I may or may not be in mourning over the start of the final season of Parks and Recreation. Don't even get me started on the fact that they are only doing 13 episodes. When I saw Amy Poehler had written an autobiography, I instantly snatched it up. The book is hilarious and will give you some great insights into the hay day of SNL and Parks and Rec. It has great little touches like a chapter by Seth Meyer and footnote commentary from Greg Daniels. If you're a fan of Amy Poehler's work, this book won't disappoint!

Wool by Huge Howey

I stumbled upon Wool as a result of one of those read if you liked The Hunger Games lists. Wool is really a collection of five short stories. Set in a dystopian society, the stories follow the leaders of a community. Each story looks at a different character to bring you a complete picture of how the society operates. I convinced my husband to read this book right after I finished. He loved it too.

Shift by Huge Howey

Shift is the prequel to Wool. However, its designed to be read after Wool. It sets the stage for how the Silo was created and starts to ask the question why. While it wasn't may favorite read of the year, it provided great background for Dust.

Dust by Huge Howey

Dust answers all the lingering questions from Wool in a compelling manner. It was very, very difficult to put Dust down. You become attached to the characters as well as the deeper motivations for the actions that brought them together.

In addition to my faves from the year, I also read:

Four by Veronica Roth


Paper Towns by John Green


Mockingjay by Susan Collins

What was your favorite read of 2014?


Here's where I may be linking up:

1.12.2015

Easy ID Badge Bling Tutorial {or blah to adorable}


I originally shared this post over at The Ribbon Retreat. I was provided materials in exchange for this tutorial. Please see my Disclosures page if you have any questions.


Starting my final field placement for my Masters in Social Work, I was issued a boring black ID badge reel. It's very functional but not so pretty. What's a good DIY-er to do? Get out the craft supplies and get to work.


Taking your ID badge from boring to awesome is quick and fun. There's unlimited options for personalization.

For the three fun variations I made, you'll need:

Blank ID badge reels (I got mine from work and Etsy)
1 1/2 inch ribbon (Preppy in Italian Side Street)
5/8 inch ribbon (Solid Grosgrain in Black)
Needle and thread
Hot glue/gun

For the gem variation:


This variation could not be easier. All you have to do is apply E-6000 to the blank badge reel and press the gem on. Hold the gem in place for a few minutes to let it set up.


E-6000 smells to high heaven. Make sure you use it in a well ventilated area. Follow the E-6000 directions as to when it will be dry. I put mine in the garage for 3 days to air out. After that, the smell was gone.

For the covered button variation:


Remove the shaft from the back of the button using wire cutters. 


Follow the instructions on your covered button kit in the fabric of your choice. 


Again, use the E-6000 to adhere the button to the badge reel. Let dry (and air out!) before use.

For the bow variation:


This variation takes the longest to make. It took me a hole 10 minutes!

 First, cut a 6 inch strip from your 1 1/2 inch ribbon. Seal the ends using your preferred method.

Find the middle of the ribbon. Fold the edges of the ribbon in, creating the side loops. Slightly overlap the ribbon ends.


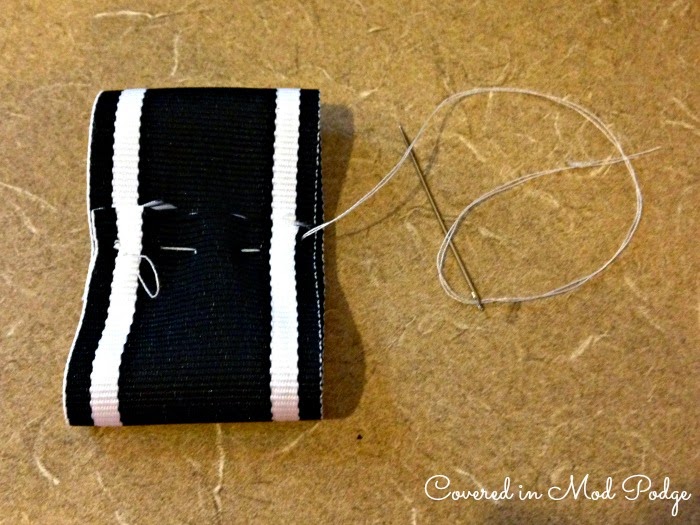
Run a gathering stitch down the middle of the ribbon.


Pull the gather stitch tight to create the bow shape. Tie off. Trim ends.


Cut a 5 or so inch length of the 5/8th inch ribbon. Tie a knot in the middle.


Place knot in front, middle of bow. Secure ends to the back of the bow with hot glue. Trim the length to get an appropriate fit.

Attach the bow to the badge reel. Be careful not too use too much E-6000 or it will bleed through the bow.


Attach your ID, access card, and/or keys to your awesome new badge reel and you're set to work in style!