11.16.2015

Christmas Tree Pillow Tutorial

This tutorial was originally shared at The Ribbon Retreat. I recieved the materials in exchange for this tutorial. All ideas and opinions are my own.


I feel like I am never quite done decorating for Christmas. We don’t tend to gussy up every inch of our home. But there’s always some small touch I want to add. These Christmas Tree Pillows are great because I can easily move them around to add a Christmasy touch to whatever room needs it. I’ve had them on my faux mantel. Right now, they’re giving my TV stand a much needed dose of Christmas Spirit. They may have also been involved in a toddler pillow fight!

What I really love about these pillows is how your fabric choice can let you match any Christmas décor. You can easily adjust for traditional, modern, vintage, whatever! Also, they don’t require a lot of fabric, and they are a quick sew.

Want to make your own set of three adorable Christmas Tree Pillows? You’ll need:
Little Fattie Pack {Aspen Forest by Basic Grey for Moda}
1 yard of coordinating fabric for backing {Shades by Riley Blake in Snow}
Thread
Poly-Fill {From local craft store}
Rotary cutter/ self-healing mat
Disappearing ink pen


To start, press all your little fatties. Then, cut up each little fattie into three inch strips {there will be leftovers}. You’ll want to cut selvedge to selvedge.

Now, determine which fabrics you want to have on each of your trees. I used three fabrics for each tree.


For your smallest {10 inch} tree, you’ll need 5 strips. The medium {12 inch} tree needs 6 strips. Finally, your largest tree {14 inch} needs 7 strips.


Once you arrange your fabrics in an order you like, you’ll sew your strips together. Make sure you are mindful of fabric pattern directions. Sew selvedge to selvedge, using a presser foot seam allowance. Keep adding strips until you have enough for your tree.

You’ll cut all your trees the same way. I’ll give you the description using the small tree’s measurements. I’ll give you the measurements for the other two after the description.


For the small tree, you need to cut an 11 by 9 triangle. Make sure you measure on the wrong side of the fabric. Starting on the bottom right {past the selvedge}, make a mark at 0, 4.5, and 9.

Draw a dashed line vertically at your 4.5 {center} mark.

Now, measure up 11 inches on a diagonal from your 0 mark to meet your center mark. Draw a line. Do the same from you 11 mark to you center mark.


Use your rotary cutter and quilting ruler to cut out your triangles along your line.

For the medium tree, you’ll need to cut a 13 by 10.5 triangle.

For the large tree, you’ll need to cut a 15 by 12 triangle.


I decide to be lazy with the backing. I put the triangle down on the backing and just cut a quick, general shape. You could always cut the backing out the same way as the front.


Now lay the front on top of the back, right sides together. Pin, marking a three inch gap. Sew your tree using a presser foot seam allowance. Make sure you leave the turning gap.

Trim your tree down to the seam allowances. Clip all three corners.

Turn your tree right side out, carefully poking out the corners with a chopstick {or other such tool}.

Repeat this process for your medium and large trees. Then, go to town stuffing them with Poly-Fill. Make sure you really get some stuffing wedged into each corner. This will make sure your trees have a nice shape.

Once stuffed, you’ll want to hand sew your gap closed. This should be done using a blind stitch. I am terrible at hand sewing. But Amy over at Positively Splendid has a great tutorial to use!


Now you can make yourself a forest of Christmas Tree Pillows. I want to try making a 6 inch tree and turning into a Christmas ornament next!


 I hope you all have a wonderful Christmas and a joyful New Year!

10.06.2015

Quilt as You Go Baby Bib Gift {or missing home}


I lived with three wonderful girls in college. They were nothing short of the best roommates I could have ever hoped for. They were a large part of what made my college experience. And they're part of what's really hard about living half a country away from family and friends. I have missed one of my roommates falling in love and getting engaged. And recently I missed the birth of another's sweet baby girl. 


It was very hard for me not to have them around to meet Emma and Wesley when they were born. And it hurt my heart overly hormonal postpartum heart to not meet Erin's tiny little arrival. So, emotional sewing seemed in order.


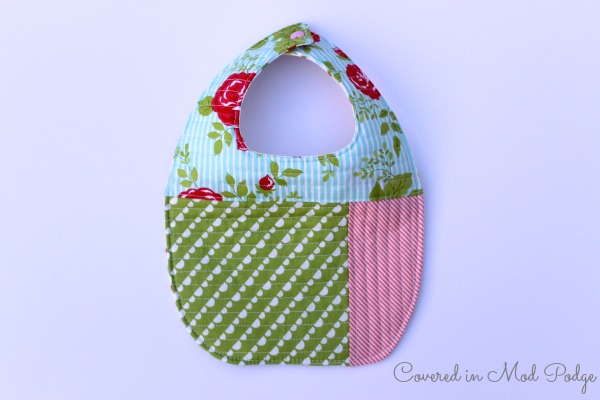
I used Simple Simon and Co's wonderful Quilt as You Go Bib tutorial. I didn't have any printer ink so I just traced one of Emma's old bibs as a pattern.


The fabrics all came out of my scrap piles. The vast majority are various Bonnie and Camille fabrics. The cross stitch looking flowers are from Riley Blake.


I'm still swooning over these sweet little heart snaps. I want to add them to everything!


Oh, and I made a bow for good measure! Because...why not!


9.18.2015

Narwal Skirt {or a 45 minutes quest for sanity}


I was having a no good, terrible, horrible, very bad day recently. It probably wasn't that bad. But sleep deprivation and tiny army of small people trying to drive you insane have a way of making things seem worse. So, I took a time out. I didn't have a lot of time. Just 45 minutes before the requirements of life caught back up to me. But I knew I would feel better if I accomplished something enjoyable during that time.


So, I busted out the sewing machine. I had thrown these two fabrics in the wash with my Color Blocked Peasant Dress fabrics on a whim. I'm so glad I did. I had a 1/2 yd cut of the narwals and 1/4 yd of the floral from forever ago. The fabrics are both from Out to Sea by Sarah Jane for Michael Miller.


Emma was taking her rest time {ie the hour where I hope and pray she'll actually take a nap but instead just kicks the wall and playing "Training Dragon" in bed}, so I couldn't measure. The skirt is a little shorter than I would normally like {would have been perfect if I had made the skirt when I bought the fabric like 18 months ago!}. When I make her clothing, I like to add extra length. She's so stinking skinny that it extends the life of the garments that I work so hard on {shhhh...don't tell her this one was so quick}. 

As soon as she got up, she wanted to try it on. So we went outside an snapped a few pictures. Her ideas of posing these days are hilarious! 


9.16.2015

Color Blocked Peasant Dress Tutorial {plus pockets!}


I cannot believe that Art Gallery Fabrics reached out to me. They provided me with the fabric for this post. All opinions, ideas, and gushing about the fabrics are my own. Check out my Disclosure Page if you have any questions!


Did you know September is National Sewing Month? I didn't either. But, I'm excited. National Sewing Month happens to coincide with both a) a recent desire to return to my sewing machine and b) a huge sewing list. Where did I start? With a first day of school dress for Pre-K.

I wanted this dress to be a little something special. I also felt like doing something I hadn't tried before. So I went with color blocking a peasant dress. I used fabrics from Curiosities by Jeni Baker from Art Gallery Fabric. Man oh man, do I love these fabrics. They feel like heaven and are just so fresh and fun.

I've got a quick tutorial for you on how to do your own color blocking on a peasant dress. I've also included how to add in seam pockets. Pockets are amazing. I've been adding them to all Emma's dresses lately. What kiddo doesn't love somewhere to stash all their treasures!

I used Whismy Couture's Pocket Peasant Dress as a starting place for this dress. You can use any peasant dress pattern that you like. I'll show you how to figure out the cuts for any size, but my color block measurements are based off of the Pocket Peasant Dress size 4T. Warning...if you use this pattern the length is quite short. I'll defiantly add a couple of inches next time.

First, figure out how much fabric your pattern piece will need. In my case, you cut out a rectangle of fabric and then use a pattern piece to cut out the arm hole. It's great...just one piece of paper to print! If you have a traditional pattern, measure the widest part of the dress and add an inch for wiggle. Then measure the hight plus an inch for wiggle. That will give you the dimensions of the rectangle you'll need for figuring out the color block panels. 


Let's start with figuring out the main fabric color block for the front and back of the dress. For my dress, the rectangle measured 19 x 22 inches. Take your width and divide it in half. Add .5 inch for seam allowances. So, 11.5 is the width I ended up with. Cut two 19 x 11.5 inch rectangles out of your main fabric. Be mindful of directional fabrics.

Alright, now on to the accent fabric. Take your width and divide into 1/4ths. Add .5 inches for seam allowances. This gives you the width of your 4 accent panels. Mine was 6 inches. Cut out four 19 x 6 inch rectangles. Again, be careful about directional fabrics {not that I had to cut twice or anything!}.

Cut your sleeves out of the accent fabric. 


Now, sew together color blocks to make the front and back rectangles that you'll cut your pattern out of. You'll have two sets of accent fabric-main fabric-accent fabric rectangles. 


Pin your accent fabric to your main fabric, right sides together. Sew with 1/2 inch seam allowance. 


Finish seams your favorite way. I use pinking sheers then zig-zag over the edges.

Repeat on the other side with your second accent panel. Finish the seam. 

Repeat for your back rectangle. 

Cut out your pattern pieces from these rectangles.

If you'd like to add in seam pockets,  Jess has a free pattern you can download! 

Cut out your pocket pattern pieces from desired fabric. I love doing something bright and fun. It's great to have a little bit of something special peaking out from the pockets! You'll cut two sets of mirrored pockets, for 4 pockets pieces total.


Measure down about 2 inches from the arm pit to place the pocket. {This is what works for my daughter an 4T dresses. Measure your little one if she's a different size.} Line up your pocket with the edge of your fabric right sides together. Sew using 1/4 inch seam allowance. I like to go over the top and bottom multiple times to reinforce these edges.


Press your pocket away from your dress. Repeat with the three other pocket pieces.


Follow your pattern's instructions for sewing up your dress. When you sew the side seams, sew around the outside of the pockets {where the pins are in the above picture}. Don't sew straight down the dress our you'll close up the pockets.


I finished up the dress with a 1.5 inch bias hem band. Dana has a wonderful tutorial on how to make bias tape if you want help finishing the dress this way. 


Just like that, she's ready for pre-k. I can't handle how big she looks in these pictures!


And now she's ready to take on school in her mama made dress! And I may finally be ready to finish up my little man's quilt! Off to the sewing machine I go!

8.13.2015

Liberty Desert Rose {or they make heart snaps!}


I was lucky enough to test Caila's beautiful pattern, The Desert Rose. I've been ridiculous and haven't made another. Until now.  


I broke into the precious stash of fabric that dad brought back from Japan and found some amazing Liberty. I lined it with some Kona from the stash. 


It's tunic length because the Liberty is a bit too thin and I was too lazy to line the whole thing. But I did put in adorable little pink heart snaps. And added pockets.


She loves, loves, loves the pockets!


8.11.2015

The Most Amazing Stain Remover {and a JBF Giveaway}


This post is brought to you by Just Between Friends Fort Worth. If you have any questions, check out my disclosure page

Oh kids, how you love to ruin clothes. Your fun in the dirt, play hard philosophy (and lack of hand eye coordination during meal time) means stains are a daily occurrence. Somehow special outfits are likely to get the brunt of your showing love in dirt ways. Mama made you a pretty new dress? Smear it with strawberries. Mama splurged on a new top from the Gap? Roll in the mud!

Sound familiar to anyone else? Most moms I know seem to develop a stain busting superpower. I know I have. But I'm always on the look out for something to make this easier. Well I've found the most amazing stain remover ever! EVER I tell you!

Let me tell you just how awesome it is. Once upon a time there was a cute giraffe shirt. Said cute shirt, two wears old, had an unfortunate meeting with a three year old and her blueberries. My normal tricks (re dawn) didn't work. And it was just too cute. So we wore it all summer, blueberry stains and all. Then I found this stain remover. And no joke at least 20 trips through the washer and dryer later, the blueberries came out. 

This stain remover is also awesome for all those baby clothes you put away clean and ready for the next kiddo. A year or four later you pull them out and they all have weirdo yellow stains on them. This bad boy will take those stains down!

The best part? All you need are three basic ingredients that you already have on hand!

Dawn
Baking Soda
Hydrogen Peroxide


Grab a small bowl and mix yourself 2 parts dawn, 2 parts baking soda, and 1 park hydrogen peroxide. It should be a slightly liquidy paste in texture.


Generously apply to the stain. Rub in well. Using an old tooth brush is probably a good idea. Let sit for at least an hour.

Throw in the wash machine with an extra rinse. Don't add more soap. The Dawn will be soap enough!


Check out your stain free clothes before tossing them in the wash. I've had to repeat this process on one stained shirt that had been in storage for a couple of years. Other than that, this seems to be a nuclear option.


Now, go and save your clothes from your kiddos. Or yourselves (eating can be hard). That whole pile was saved from the covered in stains pile. The top shirt was BRAND NEW!

This stain removal method is perfect for prepping clothes for consignment sales. I know it saved multiple items that I wouldn't have been able to sell otherwise. Now, if only I could find a way to get dryer meats crayons out of clothes! My favorite place to sell is Just Between Friends Fort Worth.

Just Between Friends Fort Worth Fall Sale is right around the corner. JBF Fort Worth is Texas' large children's and maternity consignment sale. It is a massive, one stop shop for all your clothing and gear needs! The Fall Sale will be held at Will Roger's Center in Fort Worth and is open to the public from September 3rd to the 13th (check out the full sale calendar for more details).

Need some more tips? Check out my Consignment Sale Tips and Tricks board on Pinterest!

Giveaway is now over. Congrats to Jodie on your win!

The wonderful people at JBF Fort Worth are giving away a $15 gift certificate to use at the Fall Sale.

Some rules:

* All entries will be verified.
* Gift Certificate is only valid at JBF Fort Worth's Fall Sale.
* JBF Fort Worth is hosting multiple giveaways for the Fall Sale. You can only win once per sale.
* Winner will be contacted via email. They must respond within 24 hours or another winner will be selected.


7.24.2015

How I Saved Money in Grad School {brought to you by CampusBookRentals}


This is a sponsored post written on behalf of CampusBookRentals. The content is my own. I only work with companies that I use, and love. Please see my Disclosures page if you have any questions!

My brother in law is weighing his options about if and where to attend grad school. He's rightfully being mindful of the money involved. We were lucky enough that a large portion of my husband's master's degree was paid for by the organization he did his thesis research with {which was only possible by my amazing husband working full time while taking classes}.

Right after Brad finished up his MS in Mechanical and Aeronautical Engineering, I started my MSW program. I was not so lucky to find anyone willing to pay for me to get a degree in social work. It led me to think long and hard about if grad school was the right investment for me. It also led me to find ways to live more frugally to help pay for the huge investment. My brother in law's contemplation about how to make grad school a financially realistic proposition got me thinking about how my husband and I saved money while I was in school.

1. I made sure grad school was the right investment. I thought long and hard about the investment. Would I get a good return? Could I do what I wanted to without my MSW? Talking to people in the field, I quickly realized I wasn't going to be able to do the work I wanted without my MSW. I needed the masters and the accompanying licensure to be able to practice in California. Now that I'm living in Texas, the MSW isn't required in the same way. However, I will make a great deal more a year having my MSW rather than having a bachelor's in a related field. The grad school investment will defiantly still pay off. 

2. I made careful decisions about where and when to go to grad school. After undergrad, I found myself working as an ABA behavioral therapist for children with Autism Spectrum Disorders. It was love at first sight. Working with those families gave me a clear path of what I should be doing with my life. It also led me to pursue my MSW. This job also paid very little. Like not much above the minimum wage little. I wasn't going to make a huge impact on reducing costs by working a couple of years to save. So, we decided getting started was the best plan. Now, if you're making a larger salary that might not be the case for you. You also might be able to get your company to help with tuition if you're pursuing a degree in a related field. But for me, it made more sense to get started rather than to try to save up for a year or two. 

Where to go was a whole other issue. We knew that my husband was always going to be the real money maker in the family {engineer vs. social worker}. We also knew that my husband would need to seek employment outside of our area to do the kind of work he wanted to. So, I explored online options for completing my graduate degree. This allowed me to get started regardless of a looming move at an unknown time {five months pregnant} to an unknown location {Texas of all places!}. I made sure that the program I applied to was certified by the folks to oversee social work education. I also throughly researched reputations of various programs. I wanted my degree to mean something. Getting my degree online saved me significantly as far as not having to pay university facility fees, parking, commuting, etc. I went to a reputable university with a great program. It also allowed me to get started much sooner than if I had waited to settle into a new community first.

3. I worked part time up until I had my daughter. This allowed me to contribute a small amount to my education, therefore reducing what I had to take in loans. It also let me feel like I was putting into practice what I was learning. This really helped keep my motivation high. I also think this gave me a competitive edge when it came to seeking out field placements. Good field placements allowed me to make excellent connections in the local social work community. These connections are going to make all the difference when I start looking for employment. 

4. I sought to finish in the most efficient way possible. I paid by the semester rather than by the credit hour. This meant that it made more sense for me to take extra classes so I could to finish more quickly. But, this option is really only a smart one if you know you can take on the extra load. You don't want your grades or sanity to suffer in order to take an extra class. Keeping an excellent GPA will help you get your first job more quickly and likely increase your pay.

5. I never bought new books. I hardly bought books at all for that matter. I mostly rented, saving me big bucks. And CampusBookRentals was my go to site for renting. I found their prices were consistently better than competition. Also, the books shipped free {and quickly} both ways. Not having to pay to send several large textbooks back every 8 weeks ended up being a big savings! I also had a really bad experience with another site's customer service. CampusBookRentals quickly answered questions and were very pleasant to work with. Shower me with good customer service and I'm a customer for life {hence my love for Amazon and Nordstrom!}.

I also employed general saving money tricks to keep our household costs down. I got super serious about meal planning. We drastically reduced how often we ate out. I bought nearly all of my daughter's clothes {and most her bigger ticket "stuff"} second hand. Most importantly, we made a budget and stuck to it. This helped reduce the overall portion of my husband's salary we needed to use each month, freeing more money to pay for school.

Anyone have any great tips for reducing costs during grad school? I'd love to pass them along to my brother in law!


7.22.2015

Tiered Skirt with a Surprise Tutorial


This post was originally shared at The Ribbon Retreat. I was provided with materials in exchange for a tutorial. 

This skirt is a little something I made last spring. I'm still working on catching up on old projects. But, the skirt still fits so I'm not that far behind...right!?


This fun tiered skirt has a tulle layer built in for interest. All this skirt requires is being able to sew a straight line. But, the addition of the tulle layer gives this skirt a je ne sais quoi to it! 

As I go through this tutorial, the measurements will be for a fairly skinny 3T wearing toddler. I’ll show you how I measured so you can make it in any size.

For a 3T skirt, you’ll need:
1/4 yard cuts of four different fabrics
1/2 yard of the fabric you want to use for the waist band and the bottom tier 
6 inch wide tulle closely matching one of your tier fabrics
Approx. 19 inches of 1 inch elastic
Sewing machine, rotary cutter/mat, etc.  

First, let’s measure our kiddo. Measure the waist. With a toddler, you’ll want to do this below the wonderfully chubby toddler tummy. For my kiddo, that was 19 inches.

Measure from the waist to where you want the skirt to fall. I got 13 inches a little below her knees {I’m hoping to get two years out of this baby}.

So, addition and subtraction time.You have your length, 13. Subtract 1 inch for the waist band to get 12. Now, divide that number by 5 {the number of tiers}. Round that number to something easy to cut. So I got 2.4. I rounded it to 2.5 inches. Round very closely or you’ll add a lot of extra length to your skirt without realizing it.

Start by pre-wash and iron the fabric. This really matters, I promise!

For all these strips of fabric, you’ll be cutting selvedge to selvedge {along the width of the fabric}. I’m guessing you could get away with using the width of the fabric for up to a size 8. The skirt just won’t be as full. After that, you’ll want to cut strips that are however tall you need by double the girl’s waist measurement for the width.


Ok, so for the 4 middle tiers, You’ll cut 3.5 inch strips. This is the 2.5 you got plus 1 inch for seam allowances.

For the bottom tier, you’ll cut a 4 inch strip, that’s 2.5 plus 1.5 inches for seam allowances and the hem.

For the waistband, you’ll cut another 4 inch {3 inches for the waist band that will be folded and 1 inch for seam allowances}.Your final cut is the tulle. You’ll want to cut a 176 inch length of tulle {that’s your width of fabric quadrupled} off your 6 inch wide roll.

Sick of cutting yet? It’s ok, we’re finally on to sewing.


Start with your bottom tier fabric. Press the bottom edge up 1/2 inch towards the wrong side of the fabric.Then press 1/2 inch again and pin.


Sew, making sure to back stitch. I sewed two lines of stitches for a fun look. Grab your next tier. Pin, right sides together, along the top of the bottom tier. Sew with a 1/2 inch seam allowance. Finish your seams as you like.

If you don’t have a favorite way, here’s mine:


Trim your seam allowance down to 1/4 inch using your pinking blade on your rotary cutter {or regular old pinking sheers, even plain scissors if that’s what you have}.


Zig-zag stitch over the edge of the fabric. This greatly reduces fraying. Press the seam up. Now, add you next tier. Keep going until you get to the final tier. Make sure you finish the seams and press up as you go along. This is where you’re adding the tulle.

Fold that massive strip of tulle in half, leaving you with 88 inches. Run a gathering stitch along the top and bottom of the tulle.

Adjust the gathers so that your tulle is the same length, if not a little bit longer, than the width of your tiers.


Lay down your already sewn together tiers, right side up. Place the ruffled tulle piece on top of your top tier. Use your ruffle stitch as what you line up along the raw edges of the fabric. This will make sure the stitch doesn’t end up showing. Place your final tier, right side down, on top and line up raw edges of the two fabrics.Sew, using a 1/2 inch seam allowance {make sure the raw edges of the fabric are what you’re judging the 1/2 inch from}.

Finish the seam just as you have with all the rest of the tiers. This will encase the tulle so there’s no itchiness for your kiddo.Your final seam of the tiers will be the waistband. First, fold the waistband in half, hot dog style. Press, with wrong sides together.


Line up the raw edges of the waistband with the raw edge of the final tier and the tulle. You’ll have tulle sticking out quite a ways. That’s ok.


Sew, finish, and press the same as all the other seams.


Now, square up the ends of the skirt.


Thread the elastic through the waistband using a safety pin.Tack down the elastic on each side using a zig-zag stitch. Go over it multiple times.


Pin your skirt ends together, right sides together. Make sure you take care to line up the tiers. You want the seams to match up or things will look wonky.

Using that good old 1/2 inch seam allowance, sew the final seam. Finish just as before.Turn right side out, add a cute kid, and you’re all set!