This post was originally shared over at
The Ribbon Retreat's Blog. That post is proof I had my October wreath done at an appropriate time of the month!
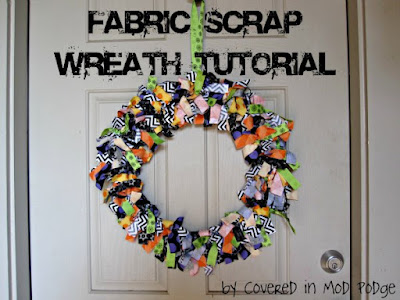
This project is super easy and makes a big statement. It's a bit time consuming. However, its all repetitive actions that can be done while emptying your DVR once your kiddos go to bed.
Are you dying to have your very own scrap wreath? Do you want one for every holiday?
Here's what you'll need to get started:
5 Fat Quarters of
fabric {I used
Black Chevrons from Robert Kaufman,
Black Web,
Purple Dot, and
Medium Orange Chevron by Riley Blake, and
Sunshine by Moda }
5 yards of two different
ribbons {I used
Spider Web and
Black Glitter}
A wire floral wreath frame from your local craft store
Rotary cutter, ruler, and self healing mat {You could do this with scissors if you really wanted to but it would seriously increase your time investment.}
Start out by cutting your fabric into strips. I made my strips 1 inch wide by about 7 1/3 inches long. Why the random measurement? Because that was what cutting the fabric in 3rds got me.
To cut your fabric, start by folding it selvedge to selvedge {or hotdog style}. Then, use your quilting ruler and rotary cutter to cut one inch wide strips. Then, unfold each strip and cut it into three equal pieces. Hence, the about 7 1/3 inch measurement.
You'll also cut your ribbon into about 7 inch segments. Don't forget to to leave a length of ribbon intact for hanging. This length is going to be baseed on where you'll be hanging your wreath. Whatever the length you want for hanging, double it and keep this in reserve.
Now, its time to get tying. You'll attach your fabric to your wreath frame using what I call a slip knot. {Please, someone let me know what this gem is really called!} First, fold your fabric in half, right sides together.
Next, fold the strip around the wire frame.
Now, bring the tails of the fabric through the loop of the fabric.
Pull the ends out until there is a tight knot. This should leave you with the right side of your fabric up.
Starting from the outside and working my way in, I tied fabric/ribbon to the first, third, and fourth ring {X marks the spot!}. I tied as many ribbons as it took for the section to look full. This varied section to section. Then, I went back in and filled in the second ring if the area looked sparse. I ended up using about 80% of the fabric and all the ribbon I cut.
I attached my hanging ribbon to the back of the wreath frame using a slip knot. I tied a small knot at the top and then hung the wreath on my door using a wreath hanger.
I am a big fan of how great this wreath turned out. It's a lot of bang for your buck. It took me about 30 minutes to cut all those strips. I'm guessing it was about three hours of tying. I did it over several different settings so it didn't get old.
You could easily make these wreaths for any holiday or to match any decor. The possibilities are really endless!
The Ribbon Retreat provided me with the ribbon and fabric in exchange for my tutorial. Check out my
disclosures page if you have any questions.

Come party with me!
C.R.A.F.T,
Mommy By Day, Crafter By Night,
Shwin & Shwin,
Tip Junkie,
Southern Lovely,
Uncommon Designs,
Somewhat Simple,
Yesterday on Tuesday,
House of Hempworths,
52 Mantels,
The CSI Project,
Serenity Now,
Tatertots and Jello,
Family Ever After,
The Grant Life,
Positively Splendid,
I {Heart} Nap Time,
It's Overflowing


