10.06.2015

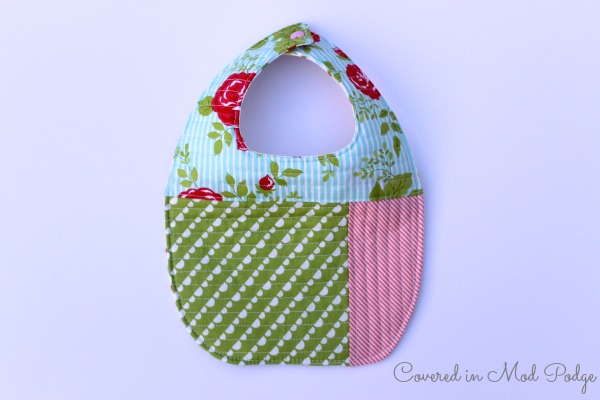
Quilt as You Go Baby Bib Gift {or missing home}


I lived with three wonderful girls in college. They were nothing short of the best roommates I could have ever hoped for. They were a large part of what made my college experience. And they're part of what's really hard about living half a country away from family and friends. I have missed one of my roommates falling in love and getting engaged. And recently I missed the birth of another's sweet baby girl. 


It was very hard for me not to have them around to meet Emma and Wesley when they were born. And it hurt my heart overly hormonal postpartum heart to not meet Erin's tiny little arrival. So, emotional sewing seemed in order.


I used Simple Simon and Co's wonderful Quilt as You Go Bib tutorial. I didn't have any printer ink so I just traced one of Emma's old bibs as a pattern.


The fabrics all came out of my scrap piles. The vast majority are various Bonnie and Camille fabrics. The cross stitch looking flowers are from Riley Blake.


I'm still swooning over these sweet little heart snaps. I want to add them to everything!


Oh, and I made a bow for good measure! Because...why not!


9.18.2015

Narwal Skirt {or a 45 minutes quest for sanity}


I was having a no good, terrible, horrible, very bad day recently. It probably wasn't that bad. But sleep deprivation and tiny army of small people trying to drive you insane have a way of making things seem worse. So, I took a time out. I didn't have a lot of time. Just 45 minutes before the requirements of life caught back up to me. But I knew I would feel better if I accomplished something enjoyable during that time.


So, I busted out the sewing machine. I had thrown these two fabrics in the wash with my Color Blocked Peasant Dress fabrics on a whim. I'm so glad I did. I had a 1/2 yd cut of the narwals and 1/4 yd of the floral from forever ago. The fabrics are both from Out to Sea by Sarah Jane for Michael Miller.


Emma was taking her rest time {ie the hour where I hope and pray she'll actually take a nap but instead just kicks the wall and playing "Training Dragon" in bed}, so I couldn't measure. The skirt is a little shorter than I would normally like {would have been perfect if I had made the skirt when I bought the fabric like 18 months ago!}. When I make her clothing, I like to add extra length. She's so stinking skinny that it extends the life of the garments that I work so hard on {shhhh...don't tell her this one was so quick}. 

As soon as she got up, she wanted to try it on. So we went outside an snapped a few pictures. Her ideas of posing these days are hilarious! 


9.16.2015

Color Blocked Peasant Dress Tutorial {plus pockets!}


I cannot believe that Art Gallery Fabrics reached out to me. They provided me with the fabric for this post. All opinions, ideas, and gushing about the fabrics are my own. Check out my Disclosure Page if you have any questions!


Did you know September is National Sewing Month? I didn't either. But, I'm excited. National Sewing Month happens to coincide with both a) a recent desire to return to my sewing machine and b) a huge sewing list. Where did I start? With a first day of school dress for Pre-K.

I wanted this dress to be a little something special. I also felt like doing something I hadn't tried before. So I went with color blocking a peasant dress. I used fabrics from Curiosities by Jeni Baker from Art Gallery Fabric. Man oh man, do I love these fabrics. They feel like heaven and are just so fresh and fun.

I've got a quick tutorial for you on how to do your own color blocking on a peasant dress. I've also included how to add in seam pockets. Pockets are amazing. I've been adding them to all Emma's dresses lately. What kiddo doesn't love somewhere to stash all their treasures!

I used Whismy Couture's Pocket Peasant Dress as a starting place for this dress. You can use any peasant dress pattern that you like. I'll show you how to figure out the cuts for any size, but my color block measurements are based off of the Pocket Peasant Dress size 4T. Warning...if you use this pattern the length is quite short. I'll defiantly add a couple of inches next time.

First, figure out how much fabric your pattern piece will need. In my case, you cut out a rectangle of fabric and then use a pattern piece to cut out the arm hole. It's great...just one piece of paper to print! If you have a traditional pattern, measure the widest part of the dress and add an inch for wiggle. Then measure the hight plus an inch for wiggle. That will give you the dimensions of the rectangle you'll need for figuring out the color block panels. 


Let's start with figuring out the main fabric color block for the front and back of the dress. For my dress, the rectangle measured 19 x 22 inches. Take your width and divide it in half. Add .5 inch for seam allowances. So, 11.5 is the width I ended up with. Cut two 19 x 11.5 inch rectangles out of your main fabric. Be mindful of directional fabrics.

Alright, now on to the accent fabric. Take your width and divide into 1/4ths. Add .5 inches for seam allowances. This gives you the width of your 4 accent panels. Mine was 6 inches. Cut out four 19 x 6 inch rectangles. Again, be careful about directional fabrics {not that I had to cut twice or anything!}.

Cut your sleeves out of the accent fabric. 


Now, sew together color blocks to make the front and back rectangles that you'll cut your pattern out of. You'll have two sets of accent fabric-main fabric-accent fabric rectangles. 


Pin your accent fabric to your main fabric, right sides together. Sew with 1/2 inch seam allowance. 


Finish seams your favorite way. I use pinking sheers then zig-zag over the edges.

Repeat on the other side with your second accent panel. Finish the seam. 

Repeat for your back rectangle. 

Cut out your pattern pieces from these rectangles.

If you'd like to add in seam pockets,  Jess has a free pattern you can download! 

Cut out your pocket pattern pieces from desired fabric. I love doing something bright and fun. It's great to have a little bit of something special peaking out from the pockets! You'll cut two sets of mirrored pockets, for 4 pockets pieces total.


Measure down about 2 inches from the arm pit to place the pocket. {This is what works for my daughter an 4T dresses. Measure your little one if she's a different size.} Line up your pocket with the edge of your fabric right sides together. Sew using 1/4 inch seam allowance. I like to go over the top and bottom multiple times to reinforce these edges.


Press your pocket away from your dress. Repeat with the three other pocket pieces.


Follow your pattern's instructions for sewing up your dress. When you sew the side seams, sew around the outside of the pockets {where the pins are in the above picture}. Don't sew straight down the dress our you'll close up the pockets.


I finished up the dress with a 1.5 inch bias hem band. Dana has a wonderful tutorial on how to make bias tape if you want help finishing the dress this way. 


Just like that, she's ready for pre-k. I can't handle how big she looks in these pictures!


And now she's ready to take on school in her mama made dress! And I may finally be ready to finish up my little man's quilt! Off to the sewing machine I go!

8.13.2015

Liberty Desert Rose {or they make heart snaps!}


I was lucky enough to test Caila's beautiful pattern, The Desert Rose. I've been ridiculous and haven't made another. Until now.  


I broke into the precious stash of fabric that dad brought back from Japan and found some amazing Liberty. I lined it with some Kona from the stash. 


It's tunic length because the Liberty is a bit too thin and I was too lazy to line the whole thing. But I did put in adorable little pink heart snaps. And added pockets.


She loves, loves, loves the pockets!


8.11.2015

The Most Amazing Stain Remover {and a JBF Giveaway}


This post is brought to you by Just Between Friends Fort Worth. If you have any questions, check out my disclosure page. 

Oh kids, how you love to ruin clothes. Your fun in the dirt, play hard philosophy (and lack of hand eye coordination during meal time) means stains are a daily occurrence. Somehow special outfits are likely to get the brunt of your showing love in dirt ways. Mama made you a pretty new dress? Smear it with strawberries. Mama splurged on a new top from the Gap? Roll in the mud!

Sound familiar to anyone else? Most moms I know seem to develop a stain busting superpower. I know I have. But I'm always on the look out for something to make this easier. Well I've found the most amazing stain remover ever! EVER I tell you!

Let me tell you just how awesome it is. Once upon a time there was a cute giraffe shirt. Said cute shirt, two wears old, had an unfortunate meeting with a three year old and her blueberries. My normal tricks (re dawn) didn't work. And it was just too cute. So we wore it all summer, blueberry stains and all. Then I found this stain remover. And no joke at least 20 trips through the washer and dryer later, the blueberries came out. 

This stain remover is also awesome for all those baby clothes you put away clean and ready for the next kiddo. A year or four later you pull them out and they all have weirdo yellow stains on them. This bad boy will take those stains down!

The best part? All you need are three basic ingredients that you already have on hand!

Dawn
Baking Soda
Hydrogen Peroxide


Grab a small bowl and mix yourself 2 parts dawn, 2 parts baking soda, and 1 park hydrogen peroxide. It should be a slightly liquidy paste in texture.


Generously apply to the stain. Rub in well. Using an old tooth brush is probably a good idea. Let sit for at least an hour.

Throw in the wash machine with an extra rinse. Don't add more soap. The Dawn will be soap enough!


Check out your stain free clothes before tossing them in the wash. I've had to repeat this process on one stained shirt that had been in storage for a couple of years. Other than that, this seems to be a nuclear option.


Now, go and save your clothes from your kiddos. Or yourselves (eating can be hard). That whole pile was saved from the covered in stains pile. The top shirt was BRAND NEW!

This stain removal method is perfect for prepping clothes for consignment sales. I know it saved multiple items that I wouldn't have been able to sell otherwise. Now, if only I could find a way to get dryer meats crayons out of clothes! My favorite place to sell is Just Between Friends Fort Worth.

Just Between Friends Fort Worth Fall Sale is right around the corner. JBF Fort Worth is Texas' large children's and maternity consignment sale. It is a massive, one stop shop for all your clothing and gear needs! The Fall Sale will be held at Will Roger's Center in Fort Worth and is open to the public from September 3rd to the 13th (check out the full sale calendar for more details).

Need some more tips? Check out my Consignment Sale Tips and Tricks board on Pinterest!

Giveaway is now over. Congrats to Jodie on your win!

The wonderful people at JBF Fort Worth are giving away a $15 gift certificate to use at the Fall Sale.

Some rules:

* All entries will be verified.
* Gift Certificate is only valid at JBF Fort Worth's Fall Sale.
* JBF Fort Worth is hosting multiple giveaways for the Fall Sale. You can only win once per sale.
* Winner will be contacted via email. They must respond within 24 hours or another winner will be selected.