1.15.2015

Best Reads of 2014 {or diving back in}


I've always been a head in the books type of girl. I was a veracious reader as a child. My teen years were spent reading through nearly every list of "classic" literature and "must reads for well educated individuals." Looking back, I was kind of a teenage literary snob {and probably a bit of a terror because of it}. However, I discovered some of my favorite books and genres during that time.

In college, I lived for summer break. I couldn't read for pleasure during the school year. As a Sociology major, I was often reading 1,000 plus pages a week {and that was selectively ignoring less important reading}. I just couldn't bring myself to look at another word on a page when I made it through my class readings. When grad school started, I promptly returned to my ignoring personal reading ways. After hours of peer reviewed journal articles, TV sounded so much better than a book.

Since graduated in August, I have rekindled my love for books. And man, it feels good.

I love seeing what other people are reading. It opens me up to books I may have never head of. So, from time to time {because we know I'm too irregular of a poster to do anything monthly} I'm going to share what I've been reading. I figured I'd start off with books I would recommend from my 2014 reading.

Contains Affiliate Links.


The Fault in Our Stars by John Green

I ran head first the teen lit genre during 2014. It's probably because I so fervently ignored it when I was a teen. Like nearly every other woman on the planet I read, and promptly fell in love with, The Fault in Our Stars. The whit was top notch. Really, I reminded me of amazing banter from Gilmore Girls. And I was smitten.

Looking for Alaska by John Green

I may or may not have read everything John Green ever wrote after I finished The Fault in Our Stars. Looking for Alaska was by far my favorite of the rest of his cannon. Really, I think I was drawn to this book because of my experience working with pre-teens and teens as a school social worker. I found it an artful look at huge topics like grief, guilt, and forgiveness for those who are left behind when a suicide occurs. The characters seemed genuine and enduring, despite the expected teen angst. If you have teenage children, I cannot highly enough recommend that you read this book together. An open dialogue about these tough issues can make all the difference.

If I Stay by Gayle Forman

Mia is a Cello prodigy with the kind of family every teen dreams of. Tragedy strikes and Mia is left with an impossible decision. The perspective of this book is what makes it a worthwhile read. The book is written from the perspective of Mia watching over herself in the hospital. The book goes back and forth between the day of the accident and stories of the past. These stories develop the rich characters of Mia and her family and friends.

Where She Went by Gayle Forman

I was so glad to find out there was a sequel to If I Stay. The ending had left me wondering the what and why of the decision. This book answers those very questions. While its missing the unique perspective of the first novel, I think its a worthwhile read. There were tough answers rather than a trite happily ever after.

A Long Way Down by Nick Hornby

Nick Hornby is such a fun author. I was a big fan of About a Boy. A Long Way Down tells the story of an unusual group of characters brought together by a reverse suicide pact. The characters are all unfailingly human. Even the annoying ones are endearing. A movie based on the book released in Britain in 2014. Do yourself a favor and read the book but skip the movie!

Yes Please by Amy Poehler

I may or may not be in mourning over the start of the final season of Parks and Recreation. Don't even get me started on the fact that they are only doing 13 episodes. When I saw Amy Poehler had written an autobiography, I instantly snatched it up. The book is hilarious and will give you some great insights into the hay day of SNL and Parks and Rec. It has great little touches like a chapter by Seth Meyer and footnote commentary from Greg Daniels. If you're a fan of Amy Poehler's work, this book won't disappoint!

Wool by Huge Howey

I stumbled upon Wool as a result of one of those read if you liked The Hunger Games lists. Wool is really a collection of five short stories. Set in a dystopian society, the stories follow the leaders of a community. Each story looks at a different character to bring you a complete picture of how the society operates. I convinced my husband to read this book right after I finished. He loved it too.

Shift by Huge Howey

Shift is the prequel to Wool. However, its designed to be read after Wool. It sets the stage for how the Silo was created and starts to ask the question why. While it wasn't may favorite read of the year, it provided great background for Dust.

Dust by Huge Howey

Dust answers all the lingering questions from Wool in a compelling manner. It was very, very difficult to put Dust down. You become attached to the characters as well as the deeper motivations for the actions that brought them together.

In addition to my faves from the year, I also read:

Four by Veronica Roth


Paper Towns by John Green


Mockingjay by Susan Collins

What was your favorite read of 2014?


Here's where I may be linking up:

1.12.2015

Easy ID Badge Bling Tutorial {or blah to adorable}


I originally shared this post over at The Ribbon Retreat. I was provided materials in exchange for this tutorial. Please see my Disclosures page if you have any questions.


Starting my final field placement for my Masters in Social Work, I was issued a boring black ID badge reel. It's very functional but not so pretty. What's a good DIY-er to do? Get out the craft supplies and get to work.


Taking your ID badge from boring to awesome is quick and fun. There's unlimited options for personalization.

For the three fun variations I made, you'll need:

Blank ID badge reels (I got mine from work and Etsy)
1 1/2 inch ribbon (Preppy in Italian Side Street)
5/8 inch ribbon (Solid Grosgrain in Black)
Needle and thread
Hot glue/gun

For the gem variation:


This variation could not be easier. All you have to do is apply E-6000 to the blank badge reel and press the gem on. Hold the gem in place for a few minutes to let it set up.


E-6000 smells to high heaven. Make sure you use it in a well ventilated area. Follow the E-6000 directions as to when it will be dry. I put mine in the garage for 3 days to air out. After that, the smell was gone.

For the covered button variation:


Remove the shaft from the back of the button using wire cutters. 


Follow the instructions on your covered button kit in the fabric of your choice. 


Again, use the E-6000 to adhere the button to the badge reel. Let dry (and air out!) before use.

For the bow variation:


This variation takes the longest to make. It took me a hole 10 minutes!

 First, cut a 6 inch strip from your 1 1/2 inch ribbon. Seal the ends using your preferred method.

Find the middle of the ribbon. Fold the edges of the ribbon in, creating the side loops. Slightly overlap the ribbon ends.


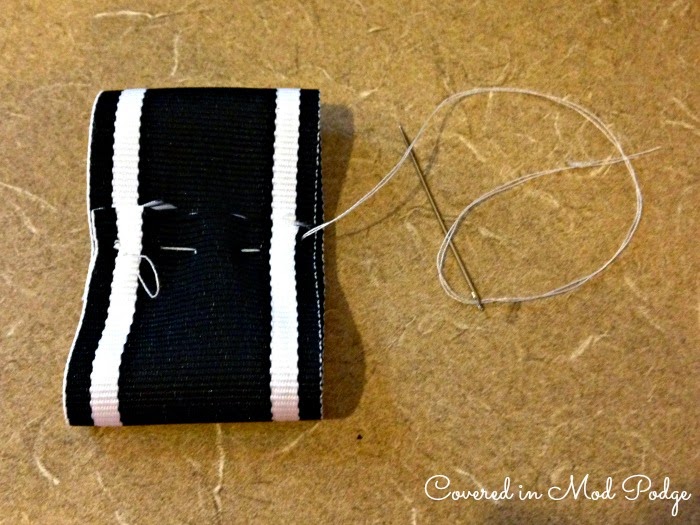
Run a gathering stitch down the middle of the ribbon.


Pull the gather stitch tight to create the bow shape. Tie off. Trim ends.


Cut a 5 or so inch length of the 5/8th inch ribbon. Tie a knot in the middle.


Place knot in front, middle of bow. Secure ends to the back of the bow with hot glue. Trim the length to get an appropriate fit.

Attach the bow to the badge reel. Be careful not too use too much E-6000 or it will bleed through the bow.


Attach your ID, access card, and/or keys to your awesome new badge reel and you're set to work in style!

12.17.2014

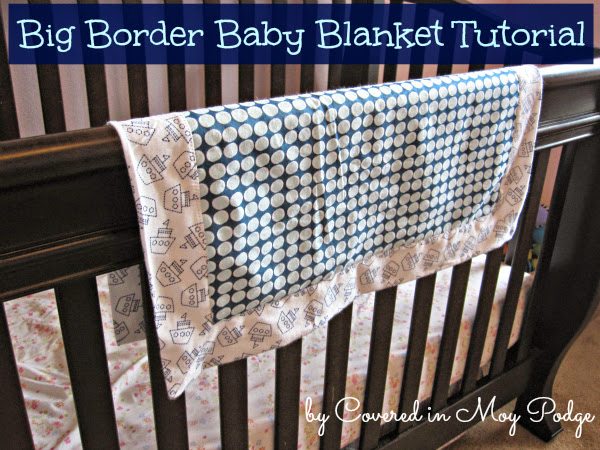
Big Border Baby Blanket Tutorial


Hey friends! Here's a tutorial for a fun baby blanket I first shared at The Grant Life. This blanket features a big border and is perfect for showing off two fun fabrics!


Want to make your own? You'll need:
1 1/4 yd of flannel
1 yd of contrasting flannel
Contrasting thread
Rotary cutter/mat

Start out by cutting your back fabric to 42 by 42 inches. Then, cut your front fabric to 32 by 32 inches. You can honestly make this blanket any sized. I like the look of a very thick border. Therefore, I make my back fabric 10 inches larger than my front fabric.


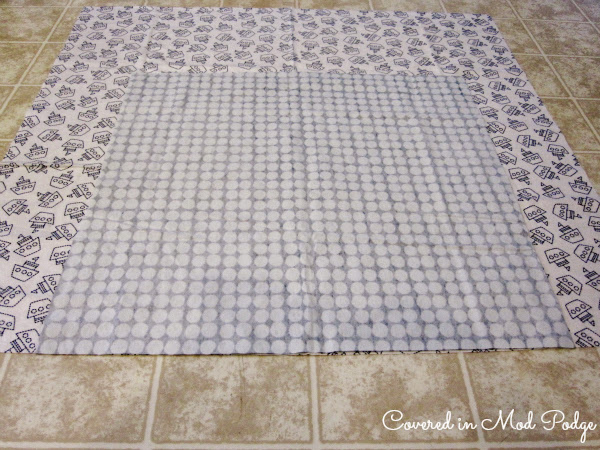
Find a large, clean work space. Lay your back fabric down, right side up.


Then, put your front fabric on top, right side down. You'll want to center your fabric on the edge of one side. So, you'll have five inches of back fabric on each side of your front fabric.

Sew along this edge, using your presser foot your seam allowance guide. Start and stop your seam 1/4 inch from the beginning and then end.  Back stitch at the beginning and end of your seam.


Now you'll move your blanket back to the ground. Its time to center your front fabric along the edge of the next side of your back fabric. You'll again have five inches on either side of your front fabric. This will form a triangle of your back fabric on the side where you had sewn along the other edge.


Sew again, starting and stopping leaving 1/4 inch on each side.


Continue on the same way with your third side. On your fourth side, make sure you leave a 5 inch gap in the middle for turning. 


Alright, now its time to get rid of all that excess fabric floating around. You'll do this by cutting off the fabric at the corners. Start by making a triangle with the excess back fabric on one corner. 


Fold the tip of the triangle down to the edge where your front fabric is.


Cut along the fold. Now sew along the open edge you just create. 


Repeat for all four corners.

Go ahead and turn your blanket. Press well, making sure to turn in the fabric from your turning gap.


When you turn your blanket, make sure your corners are pushed out all the way.

Now, top stitch along the seam between the front and back fabrics. Make sure you're careful to close the gap you left for turning the blanket. 


Once you get the hang of this blanket, you'll easily be able to make it in 30 minutes, cutting included!


Use your scraps for a bow and you have a simple, affordable baby gift! I added my favorite, miracle working diaper rash cream because I love letting new mommas know what worked for us. Let others learn from my trial and error! 

8.15.2014

Doing Good with Just Between Friends {Plus a Giveaway!}


For those of you who've been around for awhile, you're getting very used to my frequent love songs to Just Between Friends Fort Worth. It's just about sale time {eeekkk!!!}, so its time for another installment of why I'm infatuated with JBF. 


First, some JBF basics. JBF is a consignment sale for children's clothes, gear, accessories, and all that other stuff {and kids do seem to come with a lot of stuff} that you could need for your little ones. There's also plenty of maternity clothes and gear too! This sale is the largest of it's kind in the state of Texas! It's held at the Will Roger's Memorial Center and open to the public August 30-September 6. Here's a link to the full calendar.

Now, on to why I love JBF. They are committed to giving back to the community. Unsold items are donated to local organizations meeting the needs of moms and kiddos in our community. In addition, JBF is committed to giving back through the Wall of Wishes.


This sale, the Wall of Wishes is benefiting NewDay Services. NewDay Services provides:

1) Non-intrusive chaplaincy through the family and juvenile courts2) Educational and life skill programs for children and adults to cope with their circumstances3) An introduction to other community and faith-based service providers to broaden their network of support.

The Wall of Wishes is like an Angel Tree. Upon entering the sale, you'll see a board with request. Grab a card, shop for the item, and JBF will take care of getting it to NewDay. What a great way to help support programs working in our local communities!

Now, for the giveaway!

JBF is offering a $15 Gift Certificate to the Fall Sale. $15 goes sooooo far at JBF! Use the Rafflecopter to enter. And be sure to check out the rule below!

a Rafflecopter giveaway

  • Winner will be notified via email and have 24 hours to respond. If they fail to respond, a new winner will be chosen.
  • Winners can only win once per sale.
  • All entries will be verified!!!


JBF Fort Worth has compensated me for the post. Both the opinions and text are my own. I truly get giddy talking about the wonders of this sale. I would not work with them if I wasn't in love. More questions? Check out my disclosure page!


7.25.2014

Enchiladas Verde Cups {or dinner in 45 minutes or less}


Quick, yummy, and toddler friendly is the name of the game for my dinners. Really, its toddler friendly but still something my husband and I actually want to eat. These Enchiladas Verde Cups fit that bill. They are ready in 45 minutes. Emma thinks its so fun that her food is in a tortilla cup. Let's face it...my husband thinks the same thing!

So these cups are a much cheaper alternative to those cute little pre-made tortilla cups you can buy at the store. All you need is a small pack of tortillas {easy to find on sale for less than $2} and you can make 12. The store bought cups are like $4 for 6!

You'll need:
9 tortillas
Green enchilada sauce
Small can of diced green chilies
1 lb. ground chicken breast
6 oz monetary jack cheese, shredded {or pepper jack if your kiddos can handle the heat}
4 oz low fat cream cheese, softened
1 tbsp cumin
1 1/2 tsp chili powder
1 tbsp lime juice

Preheat the oven to 350.

Start out by browning the ground chicken with the cumin and chili powder. You could substitute ground turkey or ground beef if you can't find ground chicken.


While meat is browning, use a pizza cutter to cut 9 tortillas into fourths.


Spray muffin pan with non-stick cooking spray. Squish in three tortilla pieces into each cup, overlapping so there's no gaps. This will create your cup.

Once meat is browned, stir in cream cheese, green chilies, and half of enchilada sauce.


A note about the enchilada sauce. This stuff from Frontera is amazing. If you aren't making your own, its so worth the extra cost to get this bag rather than the store brand canned stuff. I wish that Frontera was paying me to say that. But they're not...its just that good.


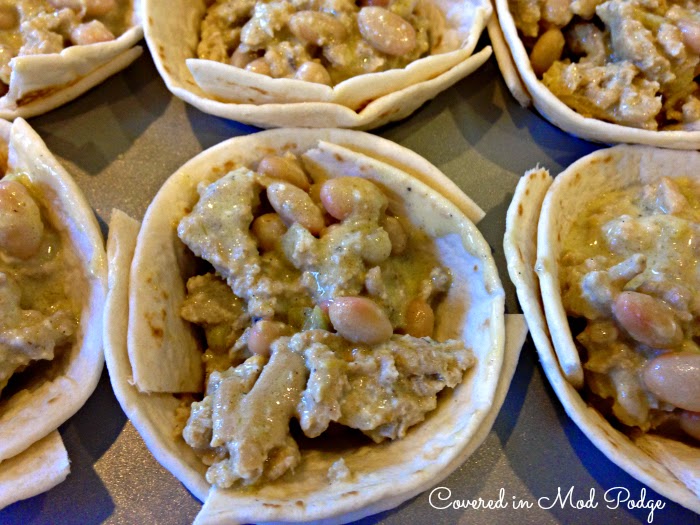
Add a little less than 1/3 a cup of the mixture to each of the 12 tortilla cups.


Drizzle remaining enchilada sauce and then add shredded cheese.


Tent these beauties with tin foil. Bake for 15 minutes.

Remove tin foil and bake for an additional 15 minutes, or until the cheese is nice and browned.


Serve with a salad and you've got yourself a yummy meal in 45 minutes or less.